
Proxmox Post-Install Networking
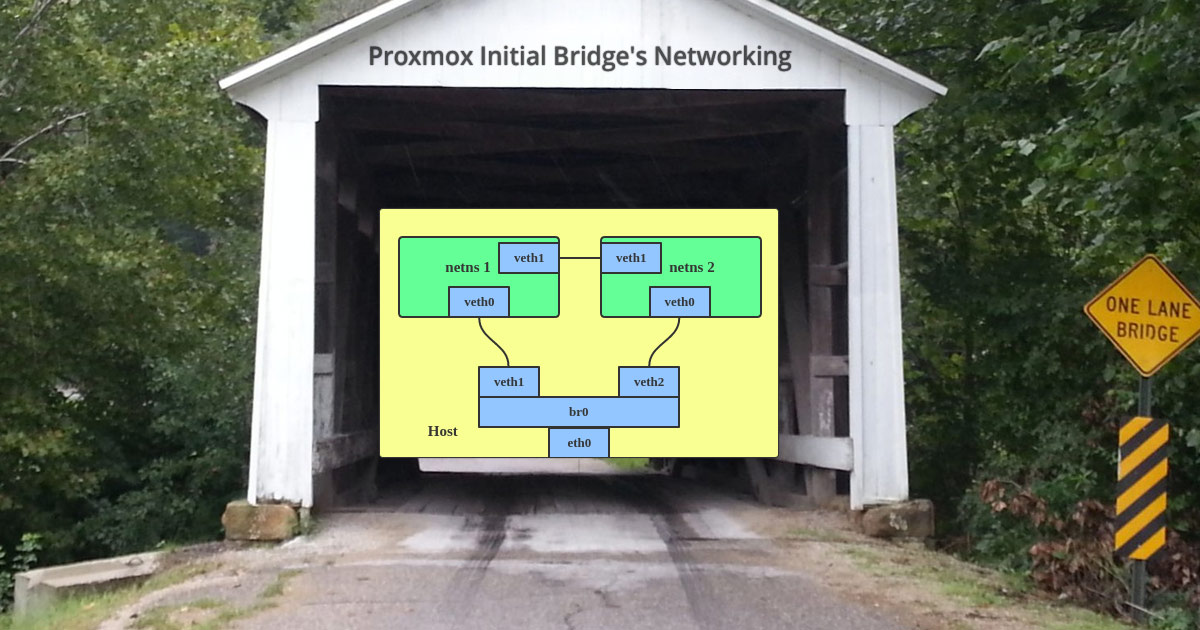
Setting up the initial Bridge
Once logged in to the web interface, we will create a Linux Bridge called vmbr0, and add the upstream nic network interface to it.
This bridge will represent our current proxmox connection.
You Must have your active connection set as manual or you will not be able to bridge the connection. ONLY use E1000 for client adapters.
Click on whatever you named your Node, then Network.
Click on the currentinterface. Edit. Erase everything. Hit ‘OK’.
Create > Linux Bridge. Name:
vmbr0. IPv4/CIDR & Gateway: Values Erased Above. Bridge ports: Name of the interface.
Pro-Tip:
As a general good practice, it is advised to duplicate bridge configurations on all Proxmox nodes so that VM migration can occur with minimal downtime.
Change a linux bridge’s mac address
Sometimes, when cloning VMs you get the same Mac Address on the VMs Networking hardware. This can be a problem, to fix this….
If you have a linux bridge using ifupdown you can temporarily set a new ip address for the bridge:
sudo ip link set dev br1 address $(printf '00:60:2F:%02X:%02X:%02X\n' $[RANDOM%256] $[RANDOM%256] $[RANDOM%256])
To perminantly set a new mac address for the bridge we need a utility called macchanger:
sudo apt install -y macchanger
printf '00:60:2F:%02X:%02X:%02X\n' $[RANDOM%256] $[RANDOM%256] $[RANDOM%256]
COPY and PASTE what the command above gave you after mac=
sudo macchanger br1 --mac=
Or if that’s just too much work, just set it to random every time it reboots:
sudo macchanger br1 --random
Proxmox handles the DNS now
resolv.conf gets overwritten
The PVE GUI expects to control DNS management and will no longer take its DNS settings from /etc/network/interfaces. Any package that auto-generates (overwrites) /etc/resolv.conf will cause DNS to fail, e.g. packages ‘resolvconf’ for IPv4 and ‘rdnssd’ for IPv6.
1
2
3
domain yourdomain.lan
search yourdomain.lan
nameserver 10.0.0.5
Network Interfaces
/etc/network/interfaces network configuration for ifup and ifdown commands
Debian Man Page for Ifup and Ifdown
FYI - refresher on updated networking commands
| Deprecated command | Replacement commands |
|---|---|
| arp | ip neighbor |
| ifconfig | ip address, ip link |
| netstat | ss |
| route | ip route |
More information on the substitutions
Proxmox Guest VLAN Network Creation
An interface needs to be created for each of the VLANs you want to pass traffic through to a VM.
Once you have created all of the interfaces and set VLANs within Proxmox, you can then configure them inside the guest VM.
sudo nano /etc/network/interfaces
1
2
3
4
5
6
7
8
9
10
11
12
13
14
15
16
17
18
19
20
21
22
23
24
auto ens18
iface ens18 inet manual

# 'bridge-utils' and 'vlan' must be installed for the following lines to work
auto br0
iface br0 inet static
    bridge_ports ens18
    address 172.21.8.31
    netmask 255.255.252.0
    network 172.21.8.0
    broadcast 172.21.11.255
    gateway 172.21.8.254
    dns-nameservers 172.21.8.53
    dns-nameservers 172.21.8.254
    dns-nameservers 172.21.192.53
    dns-search yourdomain.lan
    metric 0
    bridge-fd 2
    bridge-vlan-aware yes
    bridge-vids 2-4094
    bridge-stp on
    up /usr/sbin/brctl stp br0 on

iface br0 inet6 static
The line above is for the first network interface assigned by proxmox to the VM. This I have split into a bridge for ease of use. The bridge keeps the lowest metric for the gateway and should be the primary route for the VM to reach another machine.
1
2
3
4
5
6
7
8
9
10
11
12
13
14
15
16
17
18
19
20
21
22
23
24
25
26
27
28
29
30
31
32
33
34
35
36
37
38
39
40
41
42
43
44
45
46
47
48
49
50
 auto ens19
 iface ens19 inet static
 address 172.21.32.31
 gateway 172.21.32.254
 netmask 255.255.240.0
 dns-nameservers 172.21.32.53
 dns-nameservers 172.21.32.254
 metric 32
#DMZ,APPS

auto ens20
 iface ens20 inet static
 address 172.21.48.31
 gateway 172.21.48.254
 netmask 255.255.240.0
 dns-nameservers 172.21.48.53
 dns-nameservers 172.21.48.254
 metric 48
#WiFi


auto ens21
 iface ens21 inet static
 address 172.21.64.31
 gateway 172.21.64.254
 netmask 255.255.240.0
 dns-nameservers 172.21.64.53
 dns-nameservers 172.21.64.254
 metric 64
#UnRouted-BridgeBetweenVMs


auto ens22
 iface ens22 inet static
 address 172.21.96.31
 gateway 172.21.96.254
 netmask 255.255.240.0
 dns-nameservers 172.21.96.53
 dns-nameservers 172.21.96.254
 metric 96


auto ens23
 iface ens23 inet static
 address 172.21.112.31
 gateway 172.21.112.254
 netmask 255.255.240.0
 dns-nameservers 172.21.112.53
 dns-nameservers 172.21.112.254
 metric 112
Additional interfaces and subnets are assigned as needed.
These are for the macVlans
Subinterface
In proxmox, you can create a subinterface and dedicated bridge for that bridged connection.
Using a text editor, open the Proxmox host network configuration file:
nano /etc/network/interfaces
Add the following lines to create a VLAN subinterface. Change the interface according to your environment. For our example, we are using the eth2 interface to create a VLAN subinterface for VLAN ID 2:
1
2
3
4
5
6
7
8
9
10
11
12
13
auto vlan2
iface vlan2 inet manual
    vlan_raw_device eth2

auto vmbr2
iface vmbr2 inet manual
    bridge_ports vlan2
    bridge_stp off
    bridge_fd 0

Run the following command to activate the VLAN subinterface and bridge without rebooting:
ifup vlan2
ifup vmbr2
Three VLAN subinterfaces are created on one physical network interface along with three dedicated bridges:
1
2
3
4
5
6
7
8
9
10
11
12
13
14
15
16
17
18
19
20
21
22
23
24
25
26
27
28
29
auto vlan10
iface vlan10 inet manual
    vlan_raw_device eth1

auto vlan20
iface vlan20 inet manual
    vlan_raw_device eth1

auto vlan30
iface vlan30 inet manual
    vlan_raw_device eth1

auto vmbr10
iface vmbr10 inet manual
    bridge_ports vlan10
    bridge_stp off
    bridge_fd 0

auto vmbr20
iface vmbr20 inet manual
    bridge_ports vlan20
    bridge_stp off
    bridge_fd 0

auto vmbr30
iface vmbr30 inet manual
    bridge_ports vlan30
    bridge_stp off
    bridge_fd 0
While assigning names to bridges, it is a good idea to assign the same number as the VLAN ID. This way, it is easy to discern which VLAN a bridge belongs to.