

WireGuard on OPNsense
There are multiple scenarios where WireGuard can be used, but they all require different configs for that setup.
This writeup should enable a single user (Roadwarrior) and further along the line, a Site-to-Site VPN.
WireGuard then OPNsense
This tutorial discusses the setup of WireGuard first.
Please hang on till we’re done with WireGuard.
None of this will work without the client, peer setup, and also changing the OPNsense router and firewall.
Tutorial Steps
WireGuard
OPNsense
Site-to-Site VPN Router/Firewall
WireGuard intro
To setup WireGuard first, you must understand it’s conceptual overview.
It’s not a client/server VPN setup.
Both sides are a peer.
So, in essence - you need to setup private and public keys for each side. (Technically you will derive the public key from the private key.)
No dynamic IP assignment (or very little), each client has a fixed IP.
WireGuard associates tunnel IP addresses with public keys and remote endpoints.
Cryptokey Routing
At the heart of WireGuard is a concept called Cryptokey Routing, which works by associating public keys with a list of tunnel IP addresses that are allowed inside the WireGuard tunnel.
Each WireGuard network interface has a private key and a list of peers.
WireGuard conceptual overview example
Someone sending a packet
When
WireGuardneeds tosenda packet, it looks for the IP address in its Local Addresses Subnet.Let’s say, this packet is meant for
192.168.30.8.Your computer’s WireGuard
looksfor which peer that is.Okay, it’s for peer
ABCDEFGH. (Or if it’s not for any configured peer, drop the packet.)Encryptentire IP packet using peer ABCDEFGH’spublic key.Now where do I
sendpeer ABCDEFGH’s encrypted packet?What remote
endpointwas listed for peer ABCDEFGH?The endpoint is
listedas 216.58.211.110 port 53133.Send encrypted data over the
Internetto 216.58.211.110:53133.
WireGuard receiving a packet
When an interface for
WireGuardreceivesa packet, this could be from port forwarding or an open interface, it attempts to identify it.The WireGuard interface checks the source IP address and port to determine
whichpeerthe packet is from.Once the peer is identified, WireGuard looks up the corresponding
keyassociated with that peer from its internal configuration.It then begins to
decryptthe information that was sent.WireGuard then uses ABCDEFGH’s key to verify the
authenticityof the packet.With the accepted,
verifiedpacket - WireGuard will now remember that peer’s most recent Internetendpoint.Once all that has been completed, WireGuard will
lookat the packet.It can see the
plain-textpacket from someone on the 192.168.30.X subnet.A final verification takes place as WireGuard looks at the packet from 192.168.30.X to verify that
IPis evenallowedto be sending us packets.If the
associationis successful, the packets areallowedto pass through the VPN tunnel.
Summarize WireGuard routing
1
Some App -> WireGuard -> Destination IP in tunnel -> Public key for peer holding that IP -> peer's most recent Internet endpoint
PART II - The client device setup
WireGuard on the peer’s client machine
WireGuard is an exchange of keys. Your OPNsense firewall’s WireGuard cannot connect with a peer it doesnt have a key for. Go ahead and skip this step if you’re not using WireGuard as a Roadwarrior setup. This step is for the client machine’s peer setup. If you’re doing a WireGuard Site-to-Site VPN you may proceed to the interface creation.
There are many ways to do this, we’ll use COPY/PASTE. For ease of use, you can copy/paste a generated config from OPNsense in the WireGuard Peer Generator instead of using the clients below to generate one.
What is your machine?
This is the WireGuard peer client’s software connecting back to OPNsense. Here’s a few that I can mention:
Android
The official WireGuard app for Android - The official app includes an auto-updater, this is against F-Droid policy, and you will find this app at the IzzyOnDroid Repository.
WireGuard Tunnel - An alternative client app for WireGuard with additional features, available on F-Droid.
iOS
- The official WireGuard iOS App Store app - iOS’s official WireGuard app for iOS 15.0 or later. Mostly feature parity with Android.
MacOS
- The official WireGuard MacOS App Store app - Apple’s Mac App Store’s WireGuard app for macOS 12.0 or later. This app allows users to manage and use WireGuard tunnels.
Windows
- The official WireGuard for Windows app - This installer is the only official and recommended way of using WireGuard on Windows.
Linux
KDE - Since Plasma 5.15, Plasma support WireGuard VPN tunnels, when the appropriate Network Manager plugin is installed.
Ubuntu - WireGuard gtk gui for linux
Ubuntu Server - quick forum guide with official ppa
Debian Server - official quickstart documentation
Arch - arch wiki
Raspbian - WireGuard.how’s guide for Raspbian OS Bullseye
RHEL - Red Hat’s official documentation on WireGuard
WireGuard client key generation
There are many different clients listed above. The concept below remains the same for each of them.
Generate a private key for this peer’s client
Use your GUI
You can use any of the GUI clients to hit a button to generate a Private Key and a Public Key.
Copy the Public Key.
Windows - Example
In this example we’ll be using the Official Windows WireGuard client.
Heading over to the client machine.
Open the WireGuard client application.
Use the
Add Tunneldrop down arrow and selectAdd Empty Tunnel.You will have an
[Interface]with aPrivate Key =…. DONT MESS WITH ITCopy the
Public Keyat the top, including the equals sign.Dont copy anything else.
More information can be found here.
Use the terminal
You can also use any terminal client to do basically the same with wg genkey.
Linux Terminal - Example
This quick script will generate the keys needed to /etc/wireguard, and print them to the screen:
1
if [ "$EUID" -ne 0 ]; then echo "Please re-run as root." && sleep 2 && echo "Application Exiting..." && sleep 30 && exit 1; fi && echo -e "\n\nSetting up public & private key in /etc/wireguard\n" && wg genkey | tee /etc/wireguard/$HOSTNAME.private.key | wg pubkey > /etc/wireguard/$HOSTNAME.public.key && chmod 600 /etc/wireguard/$HOSTNAME.private.key /etc/wireguard/$HOSTNAME.public.key && echo "Private Key:" && cat /etc/wireguard/$HOSTNAME.private.key && echo -e "\nPublic Key (copy this):" && cat /etc/wireguard/$HOSTNAME.public.key;
WireGuard peer client - review
- You will need to have the
public keyfrom your client copied.
At this point we should have a public and private key generated for our client.
PART III - WireGuard Configuration
WireGuard on OPNsense
Install WireGuard on OPNsense
WireGuard is now Kernel level in OPNsense. There is no need to download a package anymore.
WireGuard tunnel subnet interface
This is the configuration for the tunnel address of the OPNsense endpoint, the “server”.
Instance is the WireGuard interface’s subnet.
VPN ▸ WireGuard ▸ Settings ▸ InstancesNew (Click on the + symbol)
Enabled
- Name -
wgopn1-memestorThese names wont be seen anywhere outside of this config screen. BUT, you will see an interface name when you go to assign an interface.
Public Key - Hit the cog. You will see a series of characters with an equals sign that will always appear at the end.
Keep hitting the cog until a public key with a series of numbers and letters appears without any special characters (except the = indicates the end of the key).
Listen Port -
51820Tunnel Address -
10.2.2.1/24Peers - Blank for now
Save
- Apply
WireGuard client endpoint as a peer
WireGuard peer info
VPN ▸ WireGuard ▸ Settings ▸ Peers ▸ Allowed IPs - These are what IP addresses are going to be permitted over the tunnel.
You can send and the server will receive it, but it will do nothing and send nothing back… UNLESS you have the SUBNET of the Endpoint’s routable network (in it’s [Interface] Address = section) on the Allowed IPs list for that endpoint.
This is why you have to configure every client that wants to connect to this firewall/WireGuardserver. (Unless they’re sharing certificates.)
That client should have created the private/public key pair, and you will paste the public key… or, try the new and easy method of The Peer Generator.
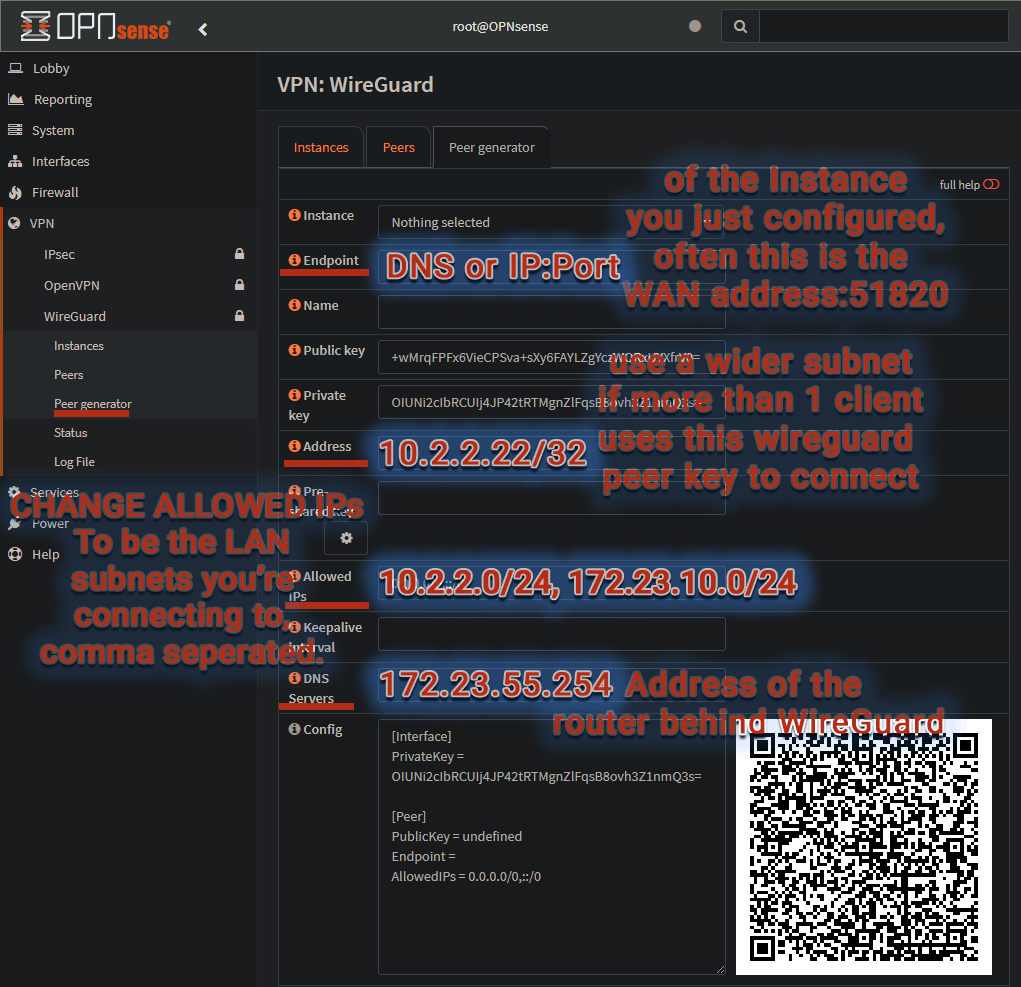
WireGuard peer creation - Peer Generator
Using the generator, you will not need the public key set earlier, it is defined in the generator. The peer generator will also load in the correct Address for you, but the rest needs set. If you’re doing a WireGuard Site-to-Site VPN go ahead and skip this step, and head to Instance/Peer creation.
VPN ▸ WireGuard ▸ Settings ▸ Peer GeneratorSelect the
Instanceyou would like to use, in this example it waswgopn1-memestor.Endpoint- Specify how to reach the instance, usually the public address of this firewall. (e.g. my.endpoint.local:51820)Name- thinkpadPublic key- Set by the generator and copied out of this page in the ‘config’ below.Address- Should be automatically set and incremented for each peer in the ‘instance’ subnet.If you’re using the same certificate for multiple clients, then you will need to increase the CIDR subnet for more IP addresses.
Allowed IPs- List the networks on the other side of WireGuard that we’re allowed to pass through. (e.g. - 10.2.2.0/24, 172.23.10.0/24)DNS Servers- Give the address of the router, on that network’s ‘Allowed IPs’ subnet.Config- Here lies the generated WireGuard config. Copy this text and save it to for your client, ‘WireGuard-memestor.conf’You will NOT get a chance to copy the ‘Private Key’ again, as it will only appear on here this screen, now. Refresh, clears it - Save, clears it.
WireGuard peer creation - Manual Creation
If you’re using the ‘peer generator’ instructions above, feel free to skip this section. This page is where you setup each individual key connecting to WireGuard, and is why we were required to setup the client, for the key generation earlier. Again, if you’re doing a WireGuard Site-to-Site VPN go ahead and skip this step and head below.
VPN ▸ WireGuard ▸ Settings ▸ PeersNew (Click on the + symbol)
Name- thinkpadPublic key- Paste in thePublic Keyfrom the client machine you generated earlier.If you forgot, you will need to go to the client you’re using and copy the Public Key.
Pre-shared Key—Optional, and may be omitted. This option adds an additional layer of symmetric-key cryptography for post-quantum resistance. You will need to take this key from OPNsense to the client. Write it down or copy it.Allowed IPs-10.2.2.0/24, 172.23.10.0/24Allowed IPsadds a route inside of opnsense to the “allowed IPs” subnet over WireGuard’s local profile’sTunnel Address.- Endpoint address -
coolserver.dyndns.netHow do you reach the server you’re connecting to?
Endpoint port -
51820Instances - Should have the name of the tunnel subnet we made earlier,
wgopn1-memestor.Keep Alive interval -
15Save
- Apply
If a site/instance/peer is behind NAT, a Keep Alive has to be set on the site behind the NAT. The Keep Alive should be set above, if you followed the tutorial, to 25 seconds as stated in the official WireGuard docs. It keeps the UDP session open when no traffic flows, preventing the WireGuard tunnel from becoming stale because the outbound port changes. Tailscale, Zerotier, Netbird all do the same thing.
Behind a NAT? Probably. Set keep Alive!
Does your server switch IP addresses?
Is your server restricted to no open ports?
Dont worry, they make a Diet Soda special for you, it’s called
PersistentKeepalive.
One side of the Wireguard connection can be hidden
The server with the open port doesn’t need to have a PersistentKeepalive, because it’s already accessible from the outside.
The client behind NAT needs to send periodic keepalive packets to maintain the NAT mapping and keep the “hole” open.
The PersistentKeepalive setting on the client serves two purposes:
It keeps the NAT mapping alive on the client’s side, allowing incoming packets from the server to reach the client.
It ensures that the stateful firewall or NAT mapping remains valid, allowing bi-directional communication.
A typical configuration would set PersistentKeepalive to a value between 25 seconds and 15 seconds on the client side. This interval is usually sufficient to keep most NAT mappings alive without generating excessive traffic.
Finish WireGuard initial config - resetting services
The save and apply are meaningless, as WireGuard never resets the service to load the new configuration.
You must be sure to either check and uncheck the Enable WireGuard button in Settings ▸ General or go to the Dashboard and reset services from there.
WireGuard configuration - review
Reviewing what should be completed at this point.
You should have an
Instancesetup with atunnel addressthat you can use.There should also be a
Peerwith thepublic keythat was generated from your client, client being the remote machine you’re using to connect back to OPNsense.On the same
Peer, you should also have anIPset for your OPNsense’s peer within the Instance’ssubnet`.
Caveats
Allowed IPs
Generally, it is important to keep the subnets small on the endpoints, especially when using multiple endpoints.
- Allowed IPs sets routes for you, using WireGuard.
If you want to talk to that network after you’re connected, list the subnet here.
- Route all traffic over the connection (including the internet):
AllowedIPs = 0.0.0.0/0
Allowed IP Explained
In other words, when sending packets, the list of Allowed IPs behaves as a sort of routing table, and when receiving packets, the list of Allowed IPs behaves as a sort of access control list.
In sending direction this list behaves like a routing table.
In receiving direction it serves as Access Control List.
One Side Needs a Static IP
If you use hostnames in the Endpoint Address, WireGuard will only resolve them once when you start the tunnel. If both sites have dynamic Endpoint Addresses set, the tunnel will stop working if a site receive a new WAN IP lease from the ISP.
To mitigate this you’d need to check DNS resolve the IP addresses for the system, then restart WireGuard if there was a new IP.
IP addressing with WireGuard on OPNsense
OPNsense’s subnetting example:
1
Tunnel Address  >   Allowed IPs      >   OPNsense [Interface] address
WireGuard subnetting example:
1
2
3
4
   Instances    >     Peers          >   Address on the Client's Interface
       ^                ^                           ^
     Entire       Any Subnet to           Single IP that resides on both
     Subnet       connect between         the Peer's and Instance's subnet
Each WireGuard network interface has a private key and a list of peers.
Each WireGuard peer on OPNsense must have the client’s public key and match the tunnel’s Allowed IPs
PART IV - WireGuard Site-to-Site VPN
You may skip this section if you do not require a site-to-site WireGuard VPN, and you are strictly using this as a roadwarrior way to remote devices into your OPNsense router.
Doing an OPNsense Site-to-Site WireGuard VPN
The peer generator didnt help site-to-site WireGuard VPN config generation at all.
You need a seperate Instance on BOTH locations for a Site-to-Site VPN over WireGuard. 💾👍
You need to connect those Instances with a respective peer on both sites. 😀-😀
You need to have a Wireguard firewall rule set, for those interfaces to allow traffic in both directions across their respective interfaces. 🔥🧱
Setting up WireGuard on each Instance of OPNsense for Site-to-Site
The following example covers an IPv4 Site to Site WireGuard Tunnel between two OPNsense Firewalls with public IPv4 addresses on their WAN interfaces. You will connect the (Site A LAN) 172.16.0.0/24 to the (Site B LAN) 192.168.0.0/24 using the (WireGuard Transfer Network) 10.2.2.0/24. (Site A Public IP) is 203.0.113.1 and (Site B Public IP) is 203.0.113.2. On the (WireGuard Tunnel Network) the tunnel address for (Site A WireGuard) is 10.2.2.1/24 and the tunnel address for (Site B WireGuard) is 10.2.2.2/24.
Table of all addresses and interfaces used
There are a lot of confusing segments in this tutorial. I have adapted this table to the information being used.
` T A B L E __ O F __ A D D R E S S E S`
| Address | IP |
|---|---|
| WireGuard Network | 10.2.2.0/24 |
| Site A - WireGuard | 10.2.2.1/24 |
| Site B - WireGuard | 10.2.2.2/24 |
| Site A - LAN | 172.16.0.0/24 |
| Site B - LAN | 192.168.0.0/24 |
| Site A - Public WAN | 203.0.113.1 |
| Site B - Public WAN | 203.0.113.2 |
“Future-me” is ashamed to have written
10.2.2.0/24. We have (2) IP addresses required. We should use Classless Inter-Domain Routing (CIRD) to promote Variable-Length Subnet Masking (VLSM) and minimize the size of our subnets. An improved subnet size would be -/31.
Assume the network block is 10.2.2.0, and we are allocating a subnet for point-to-point links:
- Network: 10.2.2.0/31
- Usable IPs: 10.2.2.0 and 10.2.2.1
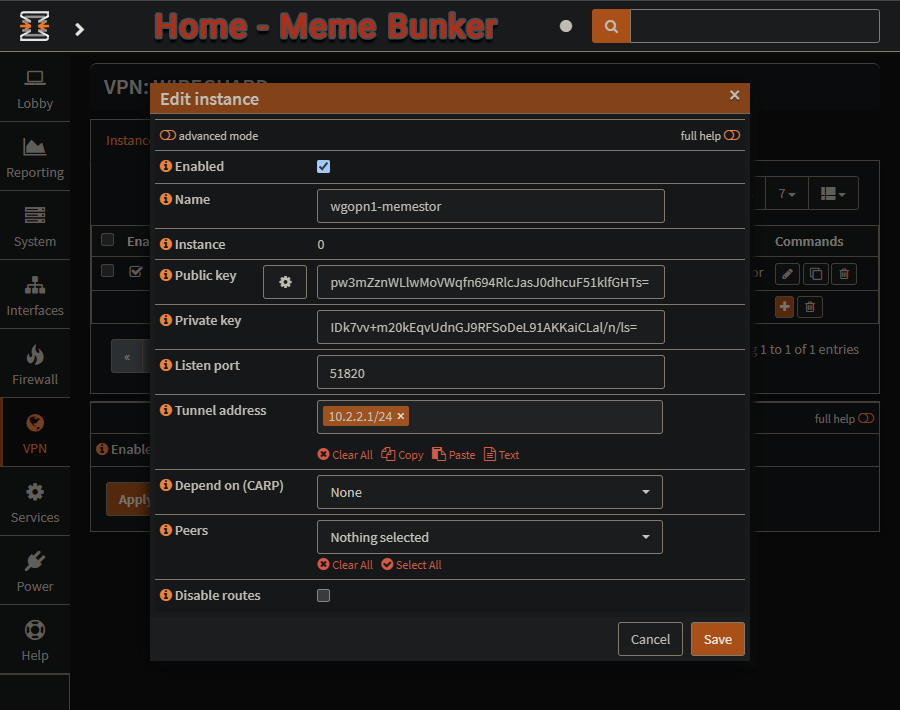
Site A - Meme Storage Bunker HQ’s Server - Instance setup
This is, presumably, the OPNsense router you’ve already been configuring from above - as this is the meme bunker. We can ignore these steps if you’ve already got the first Instance from above already setup, as these steps are primarily the same.
VPN ▸ WireGuard ▸ Settings ▸ InstancesNew (Click on the + symbol)
Enable the
advanced modetoggle in the upper corner.Name -
wgopn1-memestorPublic Key -
Generatewith “Generate new keypair” cog looking button.Copy (and label) this
public keysomewhere, as we will need it shortly.Listen Port -
51820DNS servers - Give the address of the router, on the Tunnel address’ peer’s Allowed IPs subnet.
Tunnel Address -
10.2.2.1/24Save
Apply
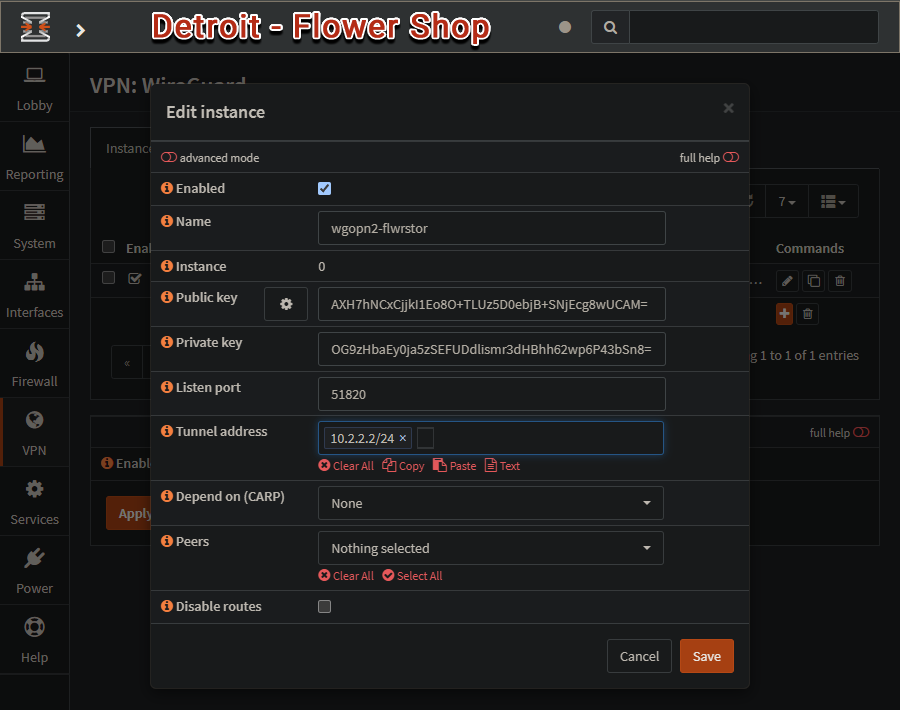
Site B - Sarah’s Flower Shop Server - Instance setup
Back in another Instance of OPNsense, we are going to follow mostly the same steps.
Get off the Airplane in Detroit.
Call Sarah and see where her Flower Shop is at.
Arrive at Flower Shop, and login to OPNsense server.
Visit:
VPN ▸ WireGuard ▸ Settings ▸ InstancesNew (Click on the + symbol)
Enable the
advanced modetoggle in the upper corner.Name -
wgopn2-flwrstorPublic Key -
Generatewith “Generate new keypair” cog looking button.Copy this
public keysomewhere, as we will need it shortly.Listen Port -
51820DNS servers - Give the address of the router, on the Tunnel address’ peer’s Allowed IPs subnet.
Tunnel Address -
10.2.2.2/24Save
Apply
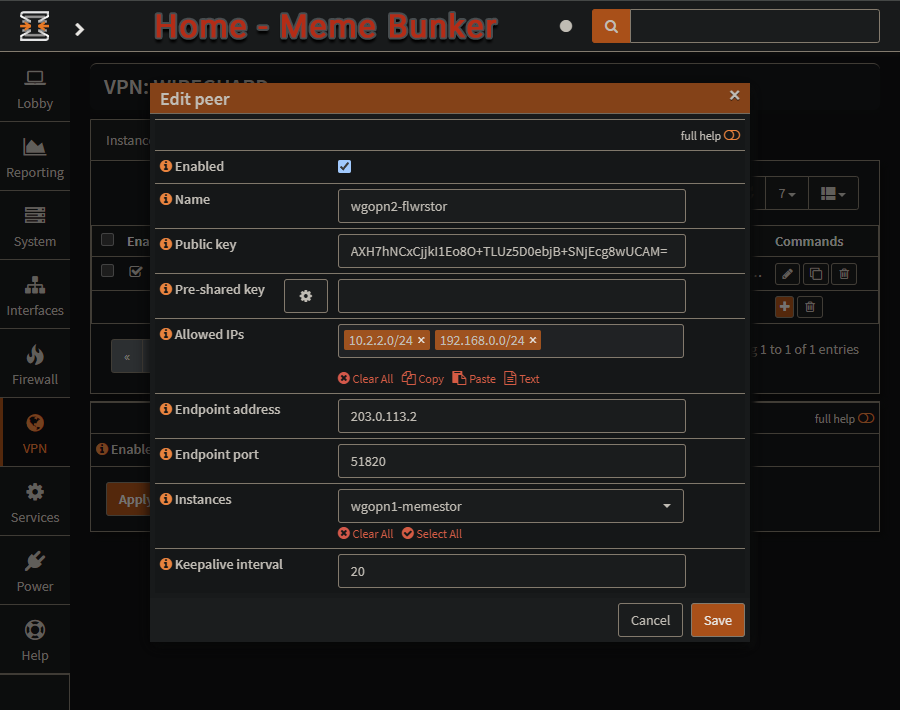
Site A - MSB HQ’s Server - Peer server setup
This OPNsense is back in the original WireGuard Instance that was made.
The Meme Storage Bunker HQ’s Server, wgopn1-memestor. Site A Instance with Tunnel Address of 10.2.2.1/24.
This part is where you will setup each individual key connecting to WireGuard, and is why the public key of each site’s Instance was copied somewhere handy.
VPN ▸ WireGuard ▸ Settings ▸ PeersNew (Click on the + symbol)
Name -
wgopn2-flwrstor- Public Key - Insert the public key of the instance from
wgopn2-flwrstor.Remember, when you were in Detroit? You setup an OPNsense WireGuard Instance at Sarah’s Flower Shop.
- Allowed IPs -
10.2.2.2/24 192.168.0.0/24You are allowing the subnet IPs of Sarah’s Flower Shop Server’s WireGuard Instance’s tunnel (10.2.2.2/24) and the subnet for Site B LAN (Sarah’s Flower Shop’s Detroit based server’s subnet).
Endpoint Address - This is set to the public IP of the WireGuard Instance we’re connecting to,
203.0.113.2.Instances - Select the Instance to connect this Peer to,
wgopn1-memestor.Save
- Apply
Site B - SFS’ Server - Peer server setup
Back in Detroit, at our other OPNsense server in Sarah’s Flower Shop - setup is primarily the same.
Sarah’s Flower Shop Server, wgopn2-flwrstor. The Site B Instance with Tunnel Address of 10.2.2.2/24.
Again, setup the key, IPs, and Instance connecting to MSB HQ’s WireGuard.
VPN ▸ WireGuard ▸ Settings ▸ PeersNew (Click on the + symbol)
Name -
wgopn1-memestor- Public Key - Insert the public key of the instance from
wgopn1-memestor.The public key you have printed and locked in a firesafe back at the Meme Storage Bunker Headquarters.
- Allowed IPs -
10.2.2.1/32 172.16.0.0/24The is for the subnet of IPs for home’s MSB WireGuard Instance tunnel (10.2.2.1/24) and the subnet for Site A LAN (Meme Storage Bunker at home server’s subnet).
Endpoint Address - This is set to the public IP of the WireGuard Instance we’re connecting to,
203.0.113.1.Instances - Select the Instance to connect this Peer to,
wgopn2-flwrstor.Save
- Apply

WireGuard site-to-site setup review
A lot of this was the same as the inital Roadwarrior setup in the beginning. The difference with site-to-site it’s between two OPNsense servers and not a peer client.
You should have an
Instancesetup on both OPNsense servers.Each WireGuard Instance should have a unique
tunnel addresson the same subnet.A
Peerwas added with thepublic keythat was generated from the server we’re going to connect to’s Instance.The
Peerneeds to have each subnet from the otherSitelisted in theAllowed IPs.On the same
Peer, theEndpoint Addressneeds to point to the other server’s connectable IP.PeersandInstancesmust alsobelongto each other with thedrop downselecting each, respectively.
Finish - by restarting services
The save and apply are meaningless, as WireGuard never resets the service to load the new configuration. You must be sure to either check and uncheck the Enable WireGuard button in Settings ▸ General or go to the Dashboard and reset services from there.
PART V - WireGuard Interface
Configure a WireGuard Interface on OPNsense
This allows separation of the firewall rules for each WireGuard instance (wgX device).
Assign an interface to WireGuard
Please note, if you have not enabled the WireGuard service the interface creation will fail.
Go to
Interfaces ▸ AssignmentsAt the bottom is the
Assign a new interfacesection.In the dropdown next to
Device, select the WireGuard device you created.- Add a description (eg wgopn1memestor)
This is what will be visible under Interfaces on the menu.
- Click the
Addbutton, then clickSave.
Enable new WireGuard interface
Click on your
new interface’s description under theInterfaces menu.Once on this new screen, we need to Enable the interface.
Enable -
CheckedLock -
Checked- IPv4 Configuration Type -
NoneThere is no need to configure IPs on the interface. The tunnel address(es) specified in the Instance configuration for your server will be automatically assigned to the interface once WireGuard is restarted
MTU -
1420MSS -
1420Save
- Apply
When assigning interfaces, make sure to edit the MTU and MSS. Setting the correct MTU can help avoid packet fragmentation and improve overall throughput. Otherwise you could get working ICMP and UDP, but some encrypted TCP sessions will refuse to work.
The maximum packet size within a WireGuard tunnel is 40 bytes less than the WireGuard MTU. This is because WireGuard adds a 40-byte overhead to each packet for its own headers. Therefore, if your WireGuard MTU is set to 1420 bytes, the maximum packet size that can be transmitted without fragmentation would be 1380 bytes (1420 - 40)
Finish WireGuard interface by resetting WireGuard services
The save and apply are meaningless, as WireGuard never resets the service to load the new configuration. You must be sure to either check and uncheck the Enable WireGuard button in Settings ▸ General or go to the Dashboard and reset services from there.
Unbound DNS requires a reload of Unbound DNS’s services to get the new WireGuard interface added.
PART VI - OPNsense rules for WireGuard
This area is where the networking configuration begins.
This may be a good time to go make a tea ☕ and grab a snack.
We are starting to shape where our traffic can and cannot go.
Please note this can be changed for preference and is not ridged.
Create a WireGuard outbound NAT rule
Detailing outbound NAT changes
This step is only necessary if you intend to allow client peers to access IPs outside of the local IPs/subnets behind OPNsense.
Think VPN provider, do you want to allow wgopn1memestor clients to forward their Internet traffic over your network?
WireGuard subnets that you want to have internet access need their subnets in Firewall ▸ NAT ▸ Outbound.
Edits made to NAT in brief:
Interface: WANSource: whatever theLocal Tunnelsubnet is set to.
Details of outbound NAT rule
Note: Changes made to the rule are highlighted as
code blocks, areas that were not modified are written as standard text.
Go to
Firewall ▸ NAT ▸ OutboundSelect
Hybrid outbound NAT rule generationat the top, if it is not already selected.Saveand thenApplychangesClick
Addto add a new rule (Click on the + symbol)Interface -
WANTCP/IP Version -
IPv4or IPv6 (as applicable)Protocol - any
Source invert - Unchecked
Source address - Select the network of our new interface:
wgopn1memestor netSource port - any
Destination invert - Unchecked
Destination address - any
Destination port - any
Translation / target - Interface address
Description -
Allow traffic from wgopn1memestor to outbound LAN/InternetSave
Apply
Setup firewall rules on OPNsense for WireGuard
This will involve two steps.
Creating a firewall rule on the WAN interface to allow clients to connect to the OPNsense WireGuard server.
Creating a firewall rule to allow access by the clients to whatever IPs on the local network they are intended to have access to.
Create firewall rules on - WAN
Letting in your port you made for WireGuard opens your firewall up. You now have a hole in your network, on the port you choose.
Be aware, UDP hole-punching is available in Wireguard, but it is one way. See the PersistentKeepalive section. VPNs like Tailscale, Zerotier, Netbird all work with this method.
Now that you’re aware of the risks and alternatives, let’s begin:
Go to
Firewall ▸ Rules ▸ WANClick
Addto add a new rule (Click on the + symbol)Action - Pass
Quick - Checked
Interface - WAN
Direction - in
Protocol -
UDPSource / Invert - Unchecked
Source - any
Destination / Invert - Unchecked
Destination -
WAN addressDestination port range - Select
(other). The number to enter is probably the default,51820, but check the WireGuard port you set in the Instance configuration on an earlier step.Description -
WireGuard in WAN allowSave
Apply
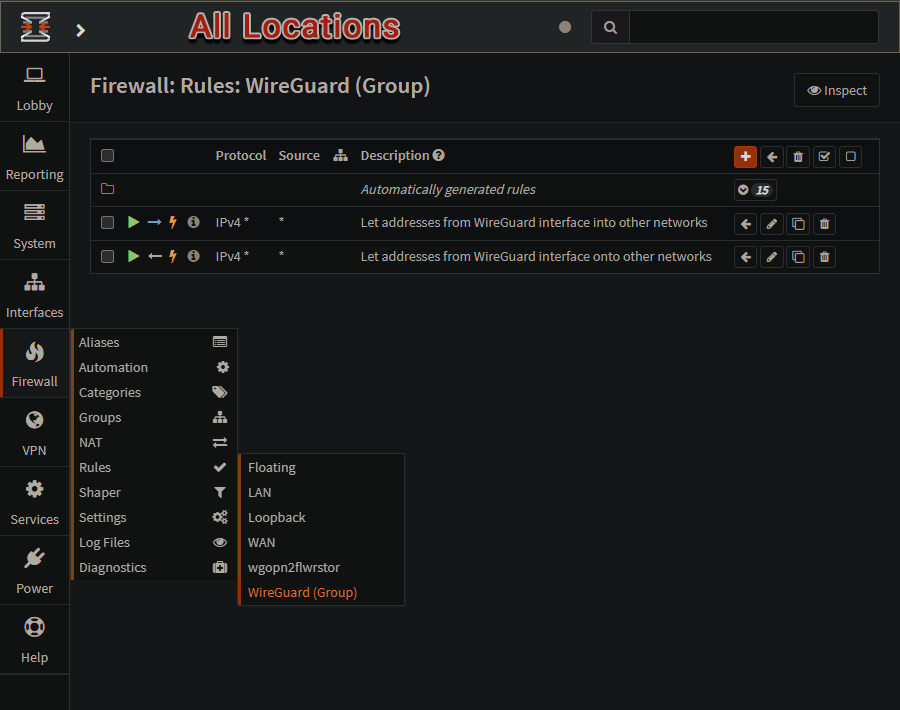
Create firewall rules on - WireGuard
The firewall rule outlined below will need to be configured on the automatically created WireGuard group that appears once the Instance configuration is enabled and WireGuard is started.
You will also need to manually specify the subnet for the tunnel.
You can also define an
alias(viaFirewall ▸ Aliases) for any IPs/subnetthat you want to use.
Go to
Firewall ▸ Rules ▸ WireGuard (Group)Click
Add(Click on the + symbol) to add a new rule.Action - Pass
Quick - Checked
Interface -
WireGuard (Group)or an aliasDirection - in
TCP/IP Version -
IPv4or IPv4+IPv6 (as applicable)Protocol - any
Source / Invert - Unchecked
Source -
WireGuard (Group) netor an aliasDestination / Invert - Unchecked
Destination - Specify the IPs or subnet that client peers
shouldbe able toaccess. You can use an alias here too.Destination port range - any
Description -
Any WireGuard interface can access these networksSave
Apply
COMPLETE
Working WireGuard Site-to-Site VPN with OPNsense
You should now have a working WireGuard VPN.
The
instancehas been made, this created ourinterfaces, and we enabled them.The WireGuard
peeris connecting to anEndpointaddresss and port – which is an open WAN port set in the firewall.The server’s instance
Public Keyis set for other machine’s connecting ‘peer’.Allowed IPsreflect the traffic that is allowed to pass through the tunnel.Firewallrules are in place to allow the WireGuard interface onto the router.
This traffic can come from anywhere and go anywhere. We should further restrict this…
PART VII - Site-to-Site VPN - OPNsense firewall configuration
You may skip this section if you do not require detailed firewalling for a site-to-site WireGuard VPN. Please note, this is not required, most can be changed for preference, and should not be considered ridged.
If you are strictly using this as a way to remote devices into your OPNsense router’s subnet, you will not need to concern yourself with the details below.
Site-to-Site WireGuard WAN connection
Think of this section like two peers connecting to each other.
You will be editing the firewall settings for the WAN connection between the two WireGuard clients.
For reference, link to table of all addresses used in this writeup.
Site A - WAN Firewall setup - Meme Storage Bunker HQ’s Server
Back at the bunker, we need to add a new rule to allow incoming WireGuard traffic from Site B (Sarah’s Flower Shop).
Go to
Firewall ▸ Rules ▸ WANClick
Add(Click on the + symbol) to add a new rule.Action - Pass
Interface - WAN
Direction - In
TCP/IP Version - IPv4
Protocol -
UDPSource -
Single host or Networkand set this to the remote site’s WAN address:203.0.113.2Destination -
WAN addressset this to the WAN address to allow on WAN from our remote source.Destination port -
51820Description -
Allow WireGuard from remote Site B to this Site A
Site B - WAN Firewall setup - Sarah’s Flower Shop Server
The same step needs to be taken, but with the WAN addresses reversed - allow incoming WireGuard traffic from Site A (Meme Storage Bunker HQ).
Go to
Firewall ▸ Rules ▸ WANClick
Add(Click on the + symbol) to add a new rule.Action - Pass
Interface - WAN
Direction - In
TCP/IP Version - IPv4
Protocol - UDP
Source -
Single host or Networkand set this to the remote site’s WAN address:203.0.113.1Destination -
WAN addressset this to the WAN address to allow a WAN connection from our remote source.Destination port -
51820Description -
Allow WireGuard from remote Site A to this Site BPress Save and Apply.
Verify WireGuard connection on Site A and Site B
Load new WireGuard configuration
Ensure you are able to reset the WireGuard service to load the new configuration.
Go to
VPN ▸ WireGuard ▸ Settingson both sites andcheckandunchecktheEnable WireGuardand pressApply.Go to the
Dashboardon both sites andreset servicesfrom there.
Check WireGuard Logs
To verify any of this is working correctly, go to VPN ▸ WireGuard ▸ Diagnostics.
You should see Send and Received traffic and Handshake should be populated by a number. This happens as soon as the first traffic flows between the sites.
If you see this, your tunnel is now up and running.
PART VIII - Site-to-Site VPN - OPNsense router configuration
Routing different subnets across WireGuard
Different subnets separate networks from communicating with each other. The firewall also stops these networks.
Currently, your two LANs cannot see each other.
We’re going to add firewall rules to allow these two sites to communicate like they were in the same room.
You can use this method to connect your home to a VPS in the cloud, or you mom’s house to your house.
For reference, link to the table of Site A and Site B LAN addresses used in this writeup.
Site A - Router Pass Traffic - Bunker HQ
Please make sure you do not have overlapping subnets.
Allow traffic between Site A LAN Net and Site B LAN Net
The first firewall rule will make sure our Bunker HQ (172.16.0.0/24) can reach Sarah (192.168.0.0/24).
Go to OPNsense Site A
Open
Firewall ▸ Rules ▸ LANandadda new rule.- Note:
Change for preference. The network you want to share with WireGuard may be different thanLAN, please modify the name of the Interface to match your network.
- Note:
Action - Pass
Interface -
LANDirection - In
TCP/IP Version - IPv4
Protocol - Any
Source -
172.16.0.0/24Source port - Any
Destination -
192.168.0.0/24Destination port - Any
Description -
Allow LAN on Site A to remote LAN Site BPress Save and Apply.
Allow traffic from WireGuard Site B LAN Net to Site A LAN Net
The second firewall rule is through the WireGuard tunnel. It allows Sarah’s LAN to reach the Bunker HQ’s LAN.
Go to OPNsense Site A
Open
Firewall ▸ Rules ▸ WireGuard (Group)andadda new rule.Action - Pass
Interface -
WireGuard (Group)Direction - In
TCP/IP Version - IPv4
Protocol - Any
Source -
192.168.0.0/24Source port - Any
Destination -
172.16.0.0/24Destination port - Any
Description -
Allow LAN on remote Site B to LAN on Site APress Save and Apply.
Site B - Router Pass Traffic - Sarah’s Shop
Please make sure you do not have overlapping subnets.
Allow traffic between Sarah’s Site B LAN Net and Site A LAN Net
Go to OPNsense Site B
Open
Firewall ▸ Rules ▸ LANandadda new rule.- Note:
Change for preference. The network you want to share with WireGuard may be different thanLAN, please modify the name of the Interface to match your network.
- Note:
Action - Pass
Interface -
LANDirection - In
TCP/IP Version - IPv4
Protocol - Any
Source -
192.168.0.0/24Source port - Any
Destination -
172.16.0.0/24Destination port - Any
Description -
Allow LAN on Site B to remote LAN Site APress Save and Apply.
Allow traffic from WireGuard Site A LAN Net to Sarah’s Site B LAN Net
Go to OPNsense Site B
Open
Firewall ▸ Rules ▸ WireGuard (Group)and add a new rule.Action - Pass
Interface -
WireGuard (Group)Direction - In
TCP/IP Version - IPv4
Protocol - Any
Source -
172.16.0.0/24Source port - Any
Destination -
192.168.0.0/24Destination port - Any
Description -
Allow LAN on remote Site A to LAN on Site BPress Save and Apply.
Now both sites have full access to the LAN of the other Site through the WireGuard Tunnel. For additional networks just add more Allowed IPs to the WireGuard Endpoints and adjust the firewall rules to allow the traffic.
Alt route - no firewall route
You can try and route without any rules. You want the wireguard subnet to be routed in its entirety to and from that gateway so that access can be established and mapped by your router without the need to add firewall rules.
Go to
System ▸ Gateways ▸ ConfigurationCreate a new gateway.
Assign the interface.
Make sure you have set the IP of your remote wireguard’s gateway’s IP, the tunnel address, in our example above it was Site B to remote Site A:
10.2.2.1/24.With a new gateway up we can point a route there.
Head to
System ▸ Routes ▸ Configuration.Create a new route.
Make the network address your WireGuard subnet.
Set the gateway dropdown to the one you defined earlier.
Open
Firewall ▸ Settings ▸ Advanced ▸ Static route filtering.Check the
Bypass firewall rules for traffic on the same interfacecheckbox.
The rest of the Firewall stuff you know
Click on Firewall -> Rules -> WireGuard
Then on the + ADD button.
Select
Single host or NetworkassourceandEnter the
IP rangeof theWireGuard networkand its subnet mask.Save.
Looking back..
Firewall -> Rules -> WireGuard, you should see – under
Sourcethe IP Address of the Internal subnet you’re using for you’re WireGuard network you made under VPN -> WireGuard -> Local.
Finish - by resetting services
The save and apply are meaningless, as WireGuard never resets the service to load the new configuration. You must be sure to either check and uncheck the Enable WireGuard button in Settings ▸ General or go to the Dashboard and reset services from there.
PART IX - The peer client
Setting up the client software
So the client needs:
Their Client Config
Endpoint config of the “server”
- Public IP of the Endpoint “server”
- Public Key of the Endpoint “server”
Example: Official Windows WireGuard client
That client software we started up and then left out in the cold, hungry for input. Let’s go do something with that client now.
Make sure the SAME client software is open, with the same
Public Keythat was copied earlier. No exit and starting over.Copy this into your client config for tunnel generation:
1
2
3
4
5
6
7
8
9
[Interface]
PrivateKey = #somenumber#
Address = 10.10.10.2/32
DNS = #Internally Routed DNS. This is on the subnet you're VPNing into, example 172.23.55.254#

[Peer]
PublicKey = #HEYWAIT!---WeDontHaveThisYet---#
AllowedIPs = 0.0.0.0/0 #This is the subnet youre VPNing into, so this would be, example 172.23.55.0/24#
Endpoint = edge.sub.domain.com:51820
That’s right! We still have to get the
Public Keyof our other confidant, the Server we’re connecting to.Moving over to the web interface, under
VPN ▸ WireGuard ▸ Settings ▸ LocalEdit the
Local Profile's Configurationthat we created earlier, namedwgopn1-memestorand copy thePublic Keymaking sure to get THE ENTIRE THING including the=Paste this into the config section of the client, under
[peer]Save
Example commented wg0.conf
THERE ARE A BUNCH OF STEPS FOR CREATING CONFIGS.
THERE ARE SEVERAL AUTO GENERATING ONES ONLINE
HERE IS ANOTHER EXAMPLE:
1
2
3
4
5
6
7
8
9
10
11
12
13
[Interface]
Address = <Configured client IP>/<Netmask> // For example the IP "10.11.0.20/32"
PrivateKey = <Private Key of the client>

[Peer]
PublicKey = <Public Key of the OPNsense WireGuard instance>
AllowedIPs = <Networks to which this client should have access>/<Netmask>
             // For example "10.11.0.0/24, 192.168.1.0/24"
             //               |             |
             //               +--> The network area of the OPNsense WireGuard VPNs
             //                             |
             //                             +--> Network behind the firewall
Endpoint = <Public IP of the OPNsense firewall>:<WireGuard Port>
Adding DNScrypt to Unbound on OPNsense
DSNCrypt is significantly faster than DoT which is faster than DoH.
DoT is faster than DoH because it works directly at the transport layer, while DoH has additional overhead due to the HTTP layer.
DNSCrypt uses UDP as it’s main performance increase.
Install DNSCrypt-Proxy for DNS encryption
Head over to your firmware section of OPNsense and install DNSCrypt-Proxy
1
2
3
4
5
New packages to be INSTALLED:
	dnscrypt-proxy2
   os-dnscrypt-proxy

Number of packages to be installed: 2
Unbound -> Query forwarding -> DNSCrypt-Proxy
Query forwarding in OPNsense’s Unbound DNS can be particularly useful when you want to access an upstream service, and provide both secure and smooth DNS resolution across your network. Here’s a detailed explanation and tutorial on how to set it up:
Why Use Query Forwarding?
Using query forwarding in Unbound with DNSCrypt ensures encrypted DNS queries for privacy and security, while still leveraging Unbound’s caching and filtering capabilities. It prevents ISPs or third parties from snooping on DNS traffic, supports DNSSEC for authenticity, and allows anonymization through DNSCrypt. This setup is ideal if you prioritize local domain resolution while securely forwarding external queries to DNSCrypt-Proxy for encryption.
This ensures that local devices can communicate using their hostnames, while external traffic is securely encrypted.
Keeping Unbound
In this section of the tutorial we need to establish the upstream (DNScrypt) server.
- Services > Unbound DNS > General
Ensure Enable Unbound DNS is checked.
Under Network Interfaces, select LAN/VLANs.
Enable DNSSEC Support.
Optionaly:
Register ISC DHCP4 Leases.
Register DHCP Static Mappings
- Services > Unbound DNS > Query Forwarding
- Uncheck Use System Nameservers
- Add Server:
Server IP: 127.0.0.1
Server Port: 15353
Description: Forward DNS to DNS-Crypt
- Disable/Delete any DNS over TLS records
- DNS over TLS will be preferred. To use the forwarding server as your primary DNS, you must disable any local DNS resolution.
- Click Save & Apply
Setting up DNSCrypt-Proxy
- Services > DNSCrypt-Proxy > Configuration
Listen Address: 127.0.0.1:15353
Uncheck:
Allow Privileged PortsBased on your requirements for your DNS server you may check:
Require DNSSEC
Require NoLog
Require NoFilter
Block IPv6
Set the Server List, these are the servers you’re reaching out to for DNS information. They all have different features. Please see this address for a list: https://dnscrypt.info/public-servers
- Based on your location pick the closest
dnscry.pt-to you.
- Based on your location pick the closest
Save
(Optionaly) Enabling Encrypted Client Hello
When using The DNSCrypt setup with DoH you have the option of using ECH. This will loose the Domain name with Encrypted Client Hello (ECH). By loose I mean your SNI wont be seen.
Pretty much this isnt implimented, so your only real option is to use Cloudflare and send all your DNS info to them, just like with a VPN, they are on the other end and can see the requests:
https://github.com/DNSCrypt/dnscrypt-proxy/wiki/Local-DoH
https://tls-ech.dev/
https://defo.ie/ech-check.php
Multiple Servers on Same Domain
Query forwarding in OPNsense’s Unbound DNS can be particularly useful when you have multiple OPNsense instances in your network, especially when one OPNsense router is behind another. This feature helps ensure smooth DNS resolution across your network hierarchy. Here’s a detailed explanation and tutorial on how to set it up:
Why Use Query Forwarding?
Query forwarding allows you to:
- Resolve local hostnames behind a secondary OPNsense router
- Forward DNS queries upstream to your primary network
- Maintain consistent DNS resolution across multiple OPNsense instances
Tutorial: Setting Up Query Forwarding
- Log into your OPNsense web interface
- Navigate to Services > Unbound DNS > Query Forwarding
- Click the “+” button to add a new forwarding rule
- Configure the following settings:
- Enabled: Check this box
- Domain: Leave blank to forward all queries (or specify a domain for selective forwarding)
- Server IP: Enter the IP address of your upstream DNS server (e.g., your primary OPNsense router’s IP)
- Server Port: Use 53 for standard DNS or 853 for DNS over TLS
- Forward TCP upstream: Check if you want to use TCP for upstream queries
- Click “Save”
- Click “Apply” to activate the changes
Example Configuration
For an OPNsense router behind another OPNsense router:
- Domain: (leave blank)
- Server IP: 192.168.1.1 (IP of primary OPNsense router)
- Server Port: 53
- Forward TCP upstream: Checked
Additional Tips
- If using DNS over TLS, ensure the upstream server supports it and use port 853
- For specific domain forwarding, enter the domain in the “Domain” field (e.g., “home.arpa”)
- You can add multiple forwarding rules for different domains or upstream servers
By implementing query forwarding, you ensure that DNS queries from devices behind your secondary OPNsense router are properly resolved, either locally or by forwarding to the primary router. This maintains consistent name resolution across your entire network infrastructure.
(Deprecated) Unbound DNS Overrides
Dont do this. Do the method above. This method is now officially deprecated. It is only here for reference.
Overview
We’ll set up a system where:
- Each site has its own OPNsense router with Unbound DNS.
- Each site can resolve hostnames for all other sites.
- DNS queries for remote sites are forwarded through the VPN.
Let’s assume we have three sites:
- Site 1: 10.1.0.0/24 (VPN IP: 10.0.0.1)
- Site 2: 10.2.0.0/24 (VPN IP: 10.0.0.2)
- Site 3: 10.3.0.0/24 (VPN IP: 10.0.0.3)
Step 1: Configure Unbound DNS on Each OPNsense Router
On each OPNsense router:
- Navigate to Services > Unbound DNS > General
- Check “Enable Unbound”
- Set “Network Interfaces” to LAN and VPN interfaces
- Enable DNSSEC
- Check “Register DHCP leases” and “Register DHCP static mappings”
- Click “Apply”
Step 2: Set Up Domain Overrides
On each OPNsense router, set up domain overrides for the other sites. This tells Unbound to forward queries for specific domains to other DNS servers.
For Site 1 OPNsense:
- Go to Services > Unbound DNS > Overrides
- Add two overrides: a. For Site 2:
- Domain: site2.domain.com
- IP Address: 10.0.0.2 (Site 2’s VPN IP)
- Description: Forward to Site 2 DNS b. For Site 3:
- Domain: site3.domain.com
- IP Address: 10.0.0.3 (Site 3’s VPN IP)
- Description: Forward to Site 3 DNS
Repeat this process on Site 2 and Site 3 OPNsense routers, adjusting the domains and IP addresses accordingly.
Step 3: Configure Host Overrides for Local Applications
On each OPNsense router, add host overrides for local applications.
For Site 1 OPNsense:
- Go to Services > Unbound DNS > Overrides
- Add a host override:
- Host: app
- Domain: site1.domain.com
- Type: A
- IP: 10.1.0.10 (local IP of the app server)
- Description: Site 1 App Server
Repeat for Site 2 (anotherapp.site2.domain.com) and Site 3 (someotherapp.site3.domain.com), using their respective local IPs.
Step 4: Configure Firewall Rules
On each OPNsense router:
- Go to Firewall > Rules
- On the VPN interface, add a rule:
- Action: Pass
- Interface: VPN
- Protocol: TCP/UDP
- Source: VPN net
- Destination: This Firewall
- Destination port range: DNS (53)
- Description: Allow DNS queries over VPN
Step 5: Configure DHCP to Use Local DNS
On each OPNsense router:
- Go to Services > DHCPv4 > [LAN interface]
- In “DNS servers”, enter the local IP of the OPNsense router (e.g., 10.1.0.1 for Site 1)
- Click “Save” and “Apply Changes”
Future Updates - help
If any of this is out of date, send me a pull request. I would love the chance to update this if there’s a change.
At the original time of writing OPNsense is at version 24.1.4
The updates that appear were done for OPNsense at version 24.7.1
Having trouble?
For a one-time donation you can get one-on-one troubleshooting support for any of my guides/projects. I’ll help you fix any issue you may have encountered regarding usage/deployment of one of my guides or projects. More info in my Github Sponsors profile.