

5pm turn off services when business hours end or while asleep at home
Homelab
Your homelab should boast, at max, 80% uptime.
If you’re asleep - unable to respond, why have services running?
WiFi turns off
Restrictive Firewall Rules in Place
Disconnect any remote VPNs
Disable app login
This concept can be expanded beyond the homelab.
Reverse Proxy business case with Traefik
In the next example we’ll do smart routing based on business hours.
Let’s say you run a pizzeria’s website.
They’re not accepting orders while the business is closed.
You could use a reverse proxy to forward /orders/
to a non-app container, a static page, mitigating attack surface, and AI crawler expense.
A great idea for managing resources effectively without sacrificing the customer experience.
Find the Traefik information in my traefik-docker-cron repository
You can find a repository for the Traefik demonstration at:
https://github.com/MarcusHoltz/traefik-docker-cron
Follow Along System
This guide is using:
OpenWRT firmware
OPNSense
Authentik: https://blog.holtzweb.com/posts/traefik-forwardauth-authentication-authentik/
In addition, you will need:
- An application you can bind a policy to. This post uses Portainer.
Turn your WiFi Off
All of your security cameras are corded and powered, riiiight? I mean, you know how easy it is to knock out a wifi signal. A motivated person would easily disable a wireless camera system, and you knew better!
Less noise. Stop those background devices (smart TVs, IoT, phones) from endlessly talking overnight.
Everyone is at home, asleep. Less radiation in our house, the better. Turn the wifi off.
Your business has employees home for the evening. Less power consumption and chance for a threat actor to do recon.
Reduced screen time. Turning off wifi can help reduce late-night screen time and encourage better routine and sleep habits.
OpenWRT as the access point
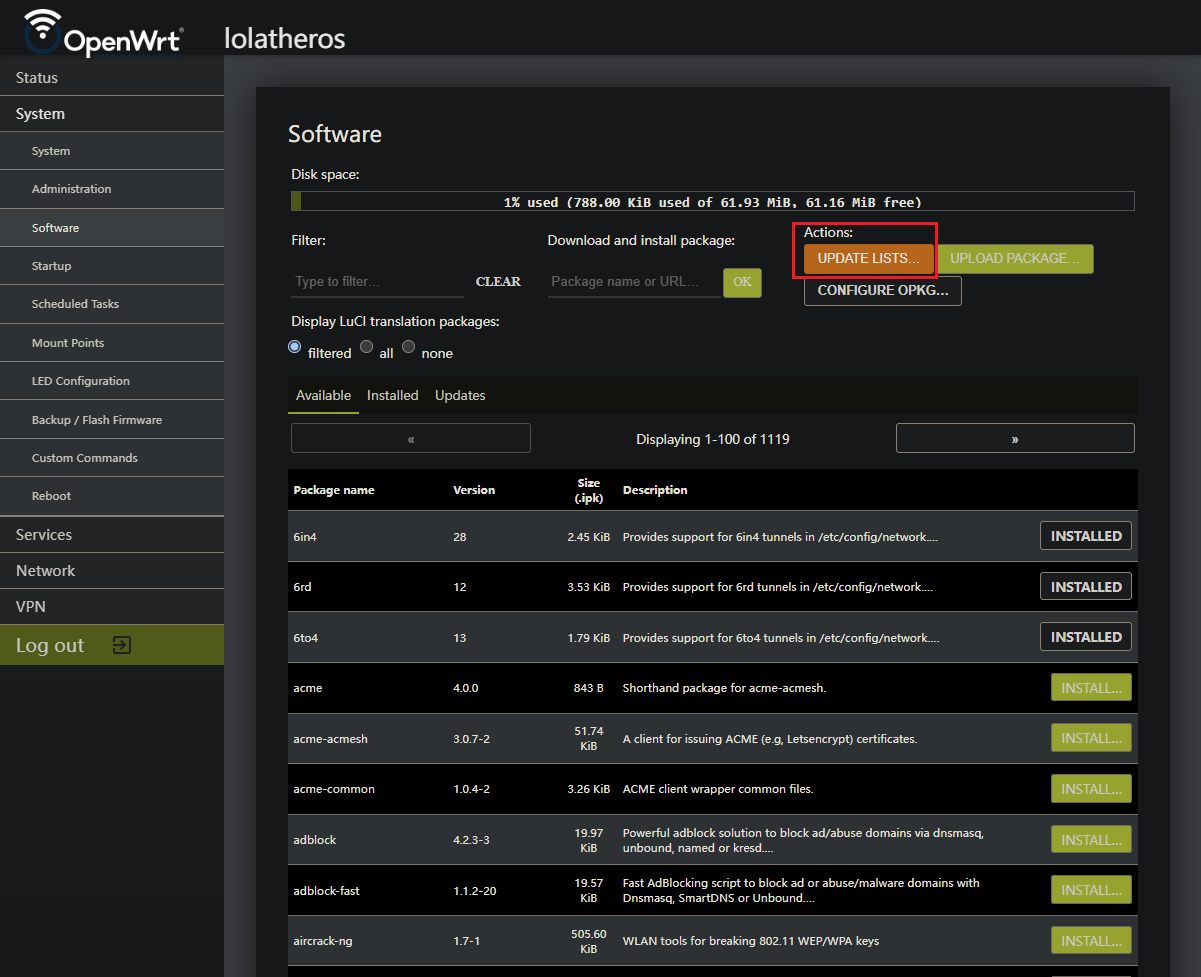
Step 1: Update OPKG package list
First thing is to update the package list
 image_caption
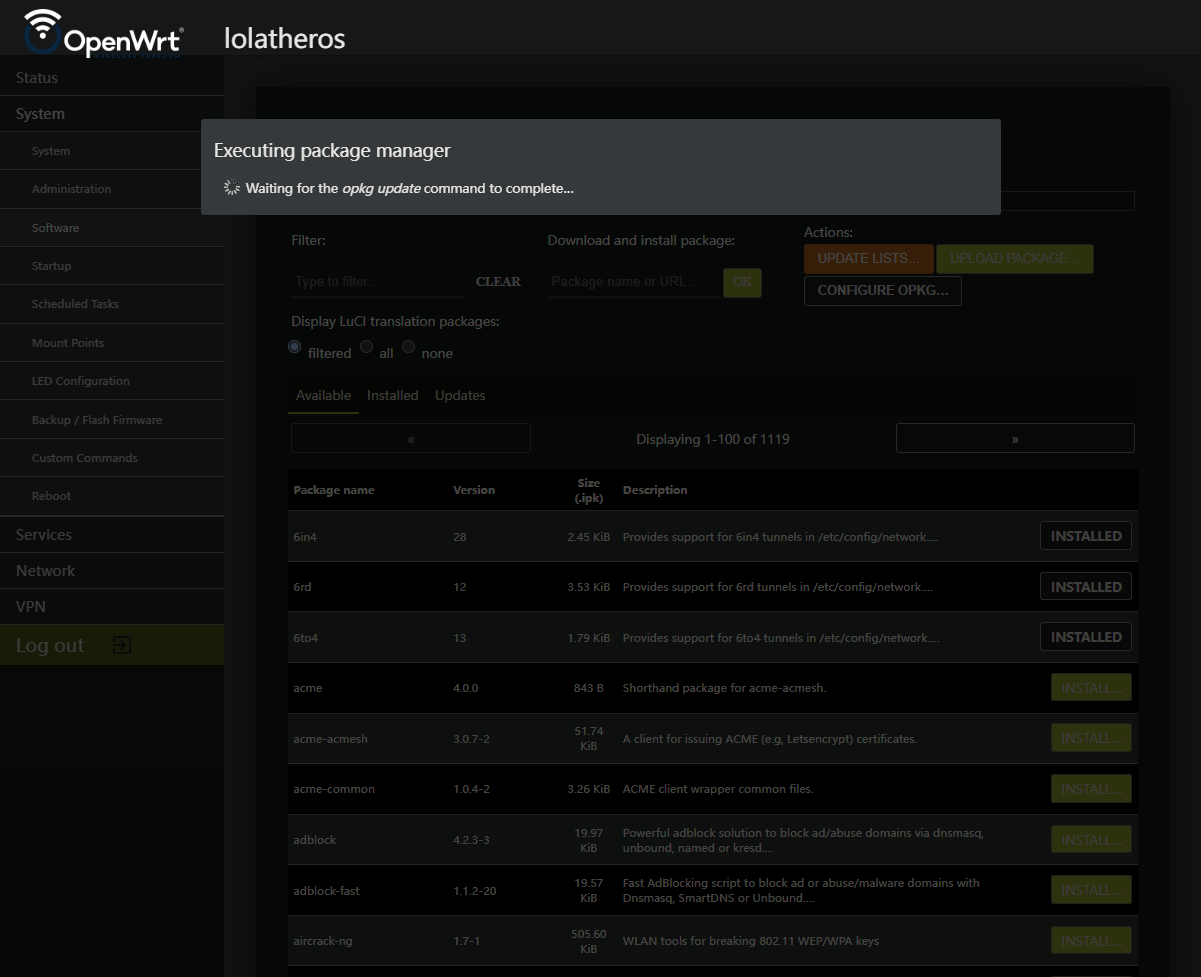
Wait as the package manager updates
 image_caption 2
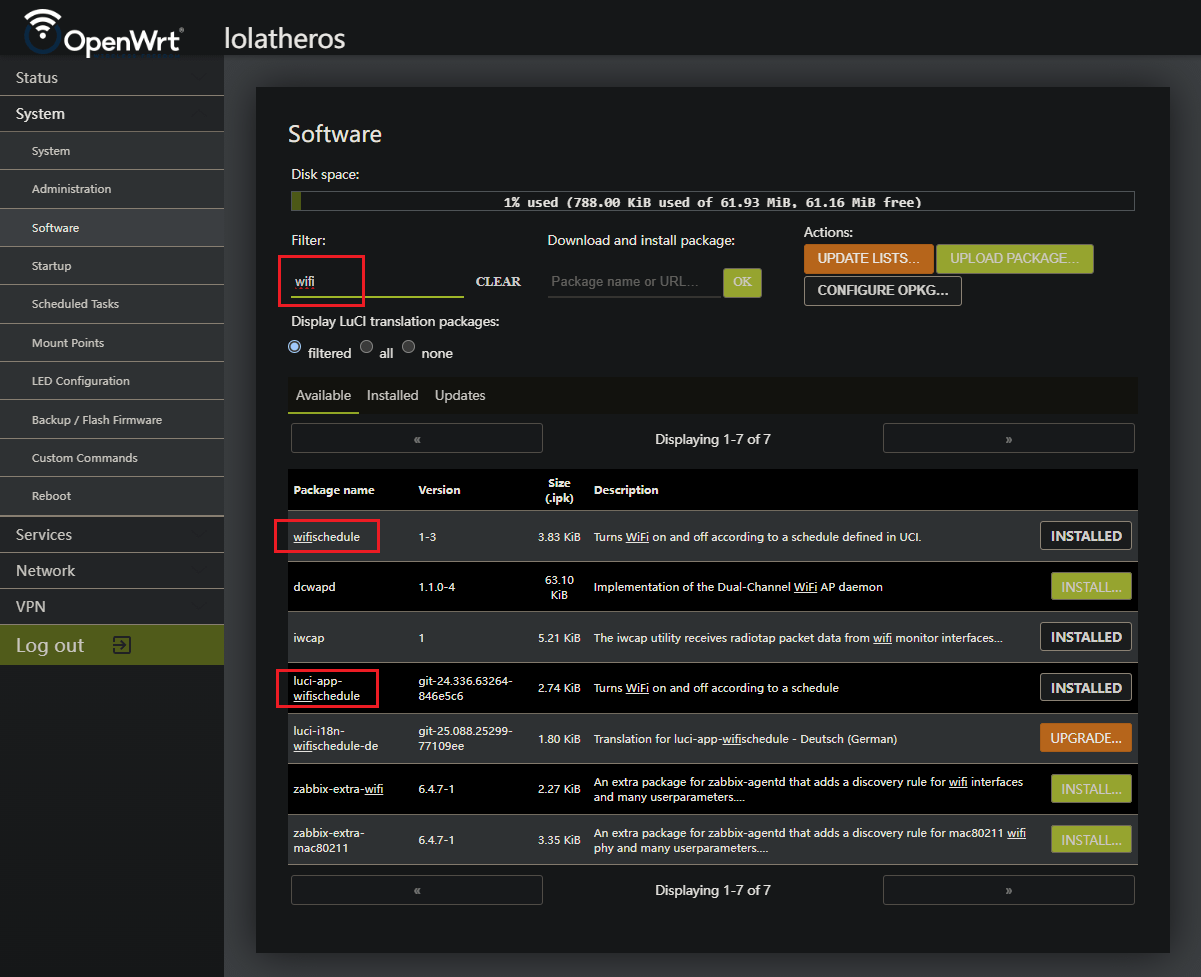
Step 2: Search OpenWRT software package list
Use the filter search bar to search for wifi
Install wifischedule
Install luci-app-wifischedule
Step 3:Using Wifi Schedule on OpenWRT
Under Services > wifischedule
Go to the Global Settings section
Make sure that Enable Wifi Schedule is checked
Head down to Schedule events

Under Schedule events
At the bottom of the screen, you will see an empty field and an Add button
You must enter the name of your event to continue, then hit the Add button
Again, at the bottom, enter the name of the schedule you’d like to create, example - BUSINESSHOURS or WEEKEND
Select the Day(s) of the week you’d like to schedule
Select the Start WiFi time
Select the Stop WiFi time
Be sure to Enable mode to continue

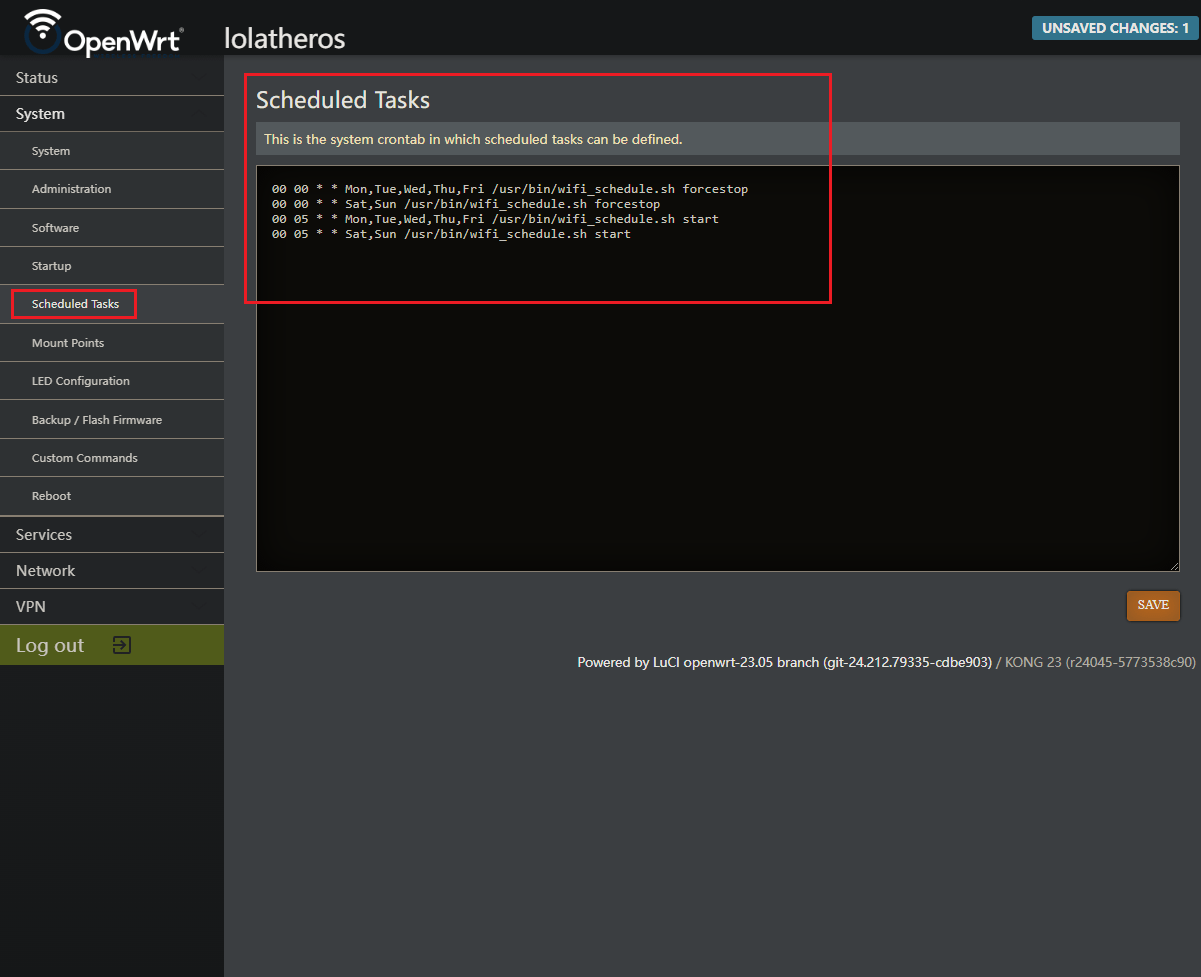
Step 4: View your added schedule in cron
You can verify that you entered everything correctly by checking OpenWRT’s crontab
Head over to System > Scheduled Tasks
Here you can see the time, days, and the script being executed for those respective times. Cool.
Change OPNSense firewall rules based on a schedule
You may also want to lock down the same VLAN on your router that is on your Access Point we just turned off.
You may want to use this concept a different way, and restrict network access or internet for certain subnets or vlans.
“No internet after dinnertime.”
“Sorry, guest Wifi only routes connections during vistor hours.”
Or, possibly, you have a close-to-air-gapped network that runs manual updates at a specific time, and restrict the internet gateway to that window of time.
OpenWRT firewall schedules
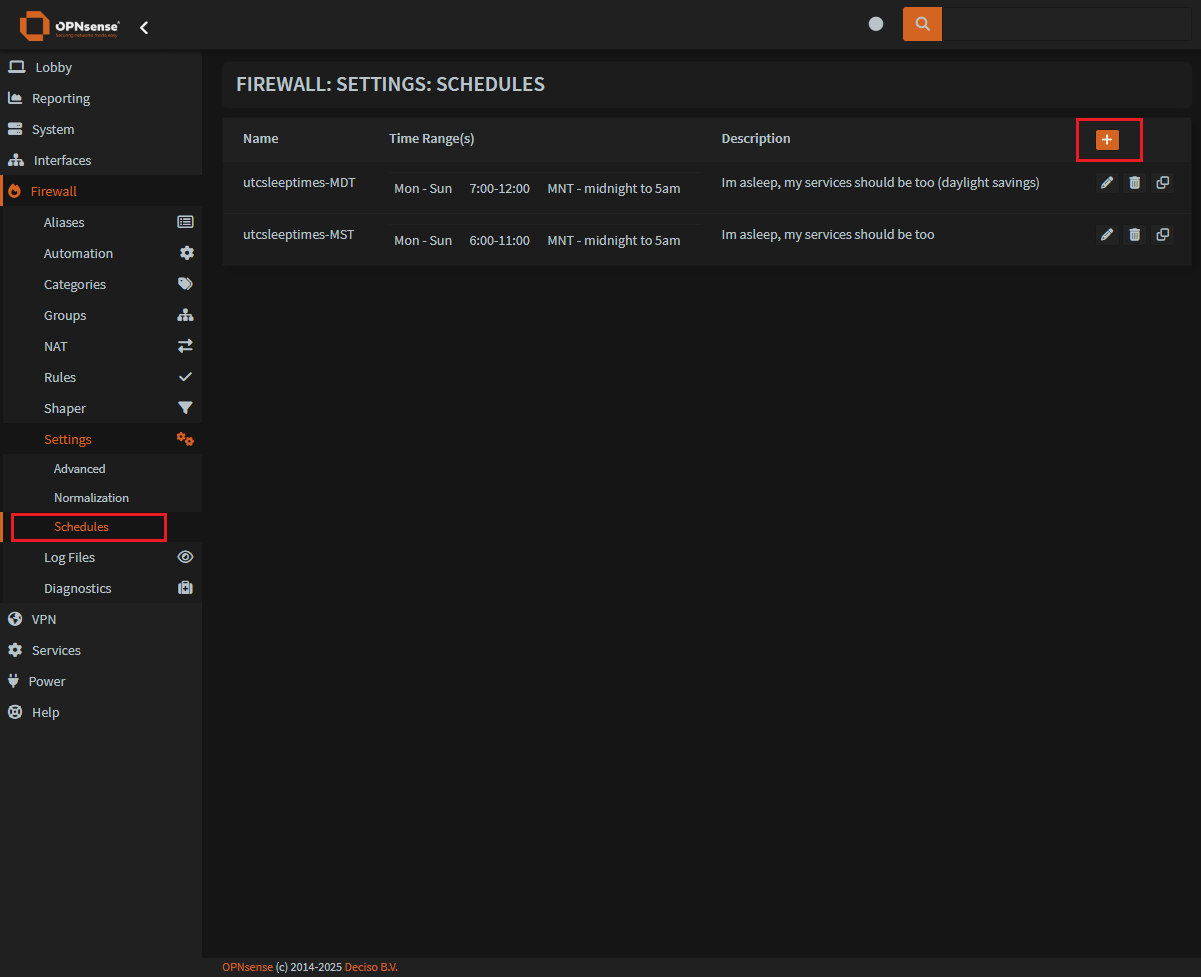
Step 1: Create a new firewall schedule
To create a new schedule:
Firewall > Settings > SchedulesClick on the
orange plusin the upper right corner
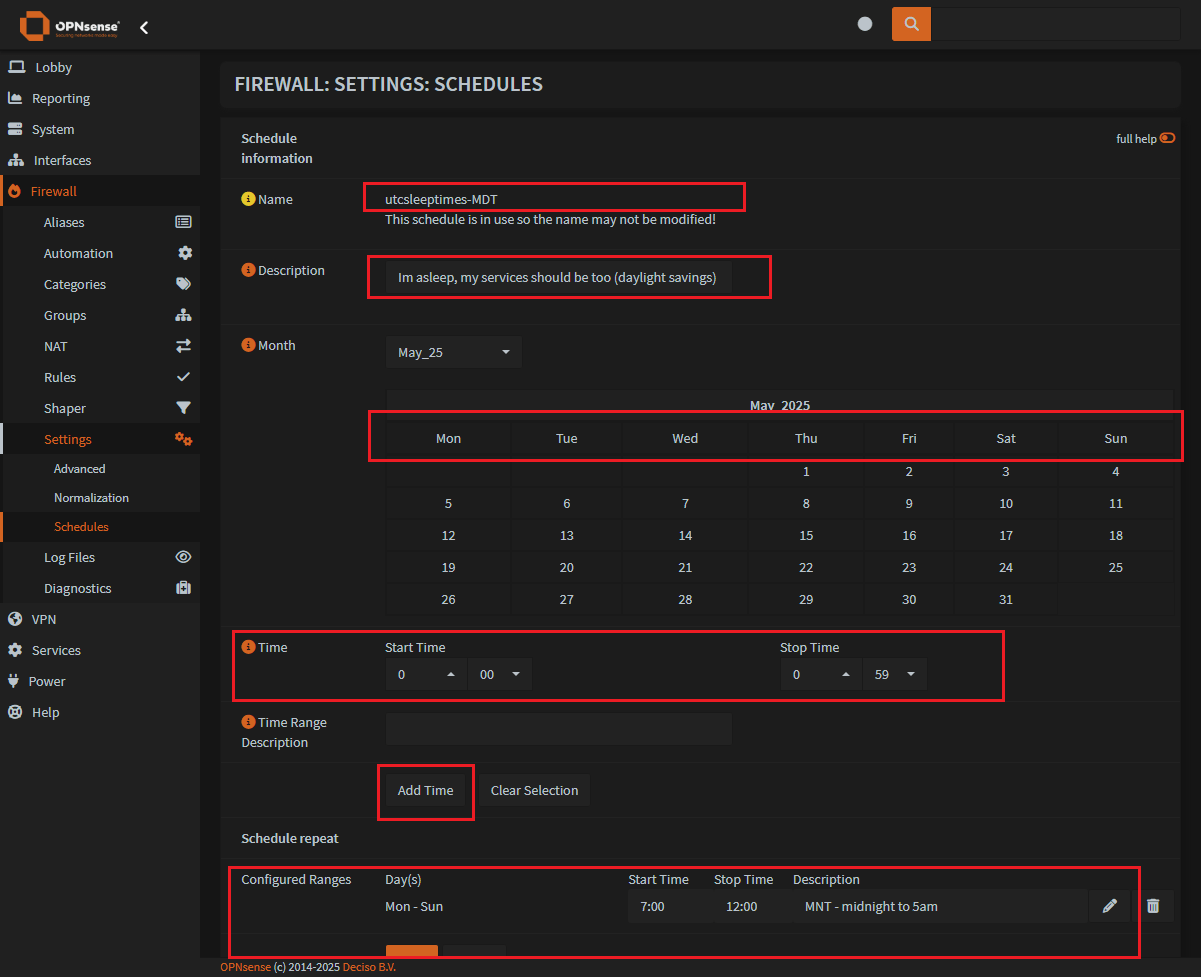
Step 2: Add the new firewall schedule
Enter a
name(This is a one time thing, you cannot change this)You can change the
descriptionSelect the
daysyou want this to be activeAdjust the
start timeandstop timefor your firewall ruleClick on
Add Timeto create the scheduleYou will see your new schedule at the bottom of the page
Hit
Saveat the bottom
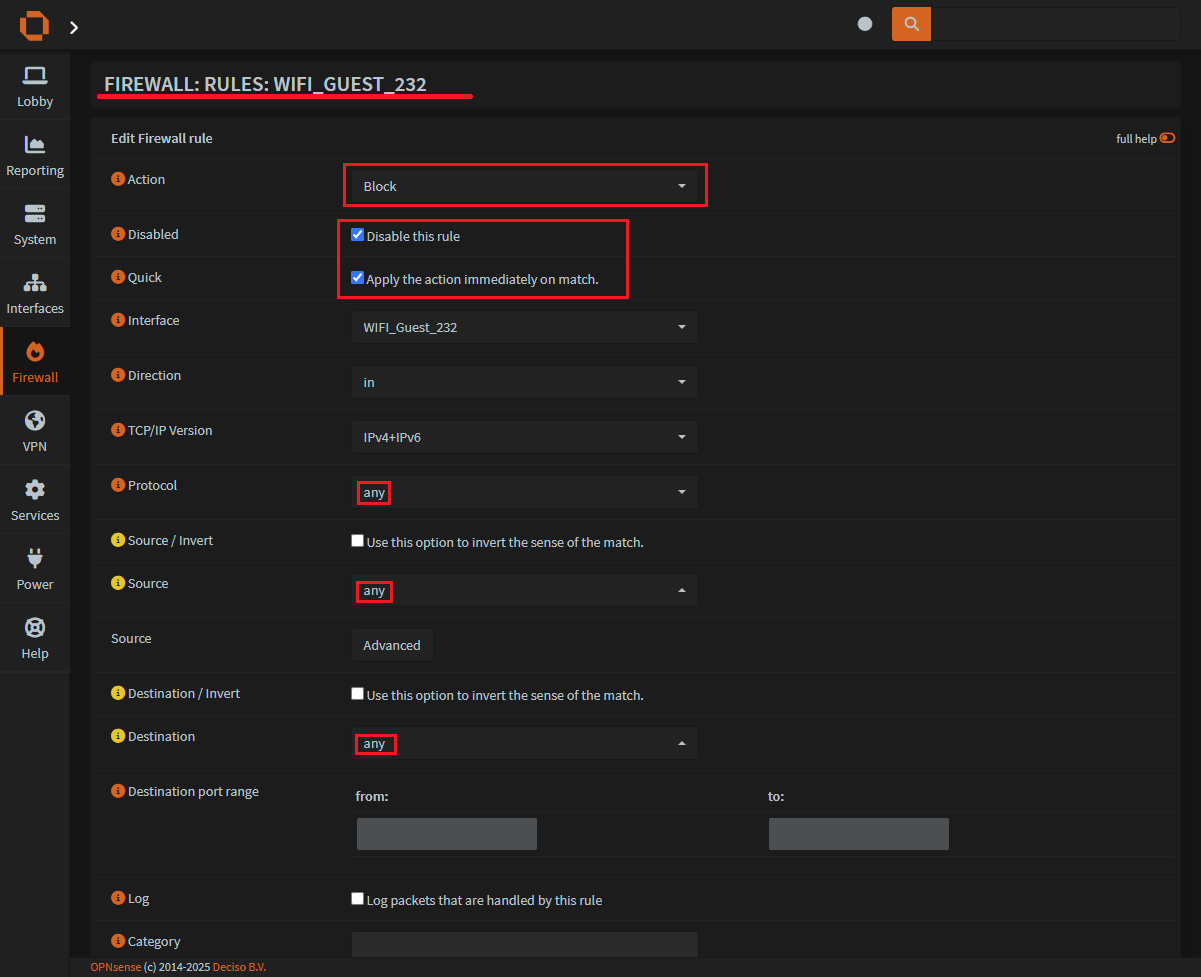
Step 3: Adding or Editing a firewall rule to schedule
To add a new firewall rule, or edit an old rule:
Firewall > RulesYou can see an existing firewall rule that has been configured with a
ScheduleYou should also see this rule has an
Xicon to indicate it is aBlockingfirewall ruleAdditionally, the
ScheduleandDescriptionare bothcrossed out, to indicate this rule is not active.
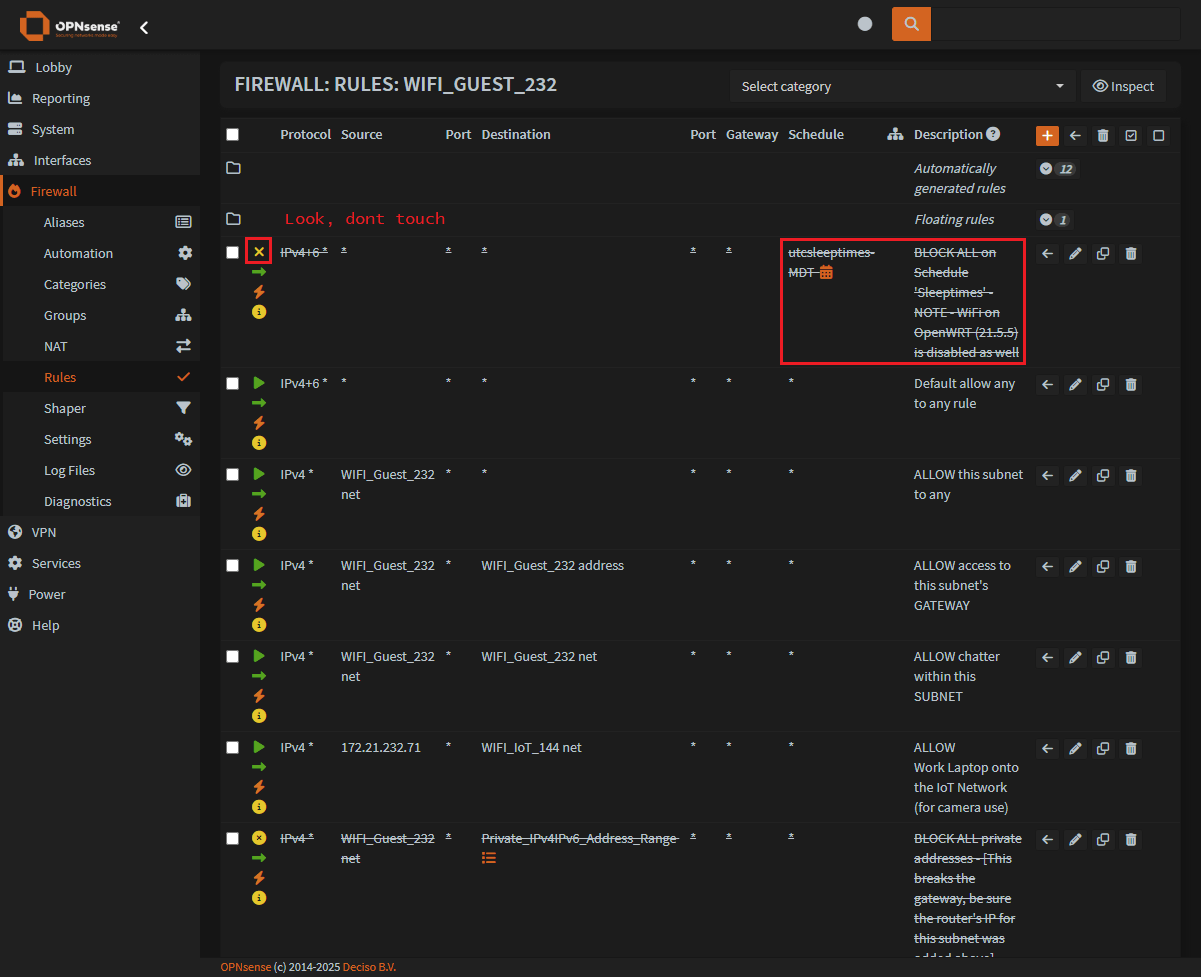
- Click on the
orange plussign to make a new rule or thepencil iconto edit an existing rule.
Step 4: Configuring an OPNSense firewall rule to schedule
On this new page there is only one section that schedules the rule, but we’ll go over the rule in the screen shot as well:
Action:
BlockDisabled:
Disable this rule(your rule will turn itself on and off as needed)Select the
interfacethat this rule is foranyfor all. This is a block everything rule, any 2 any.
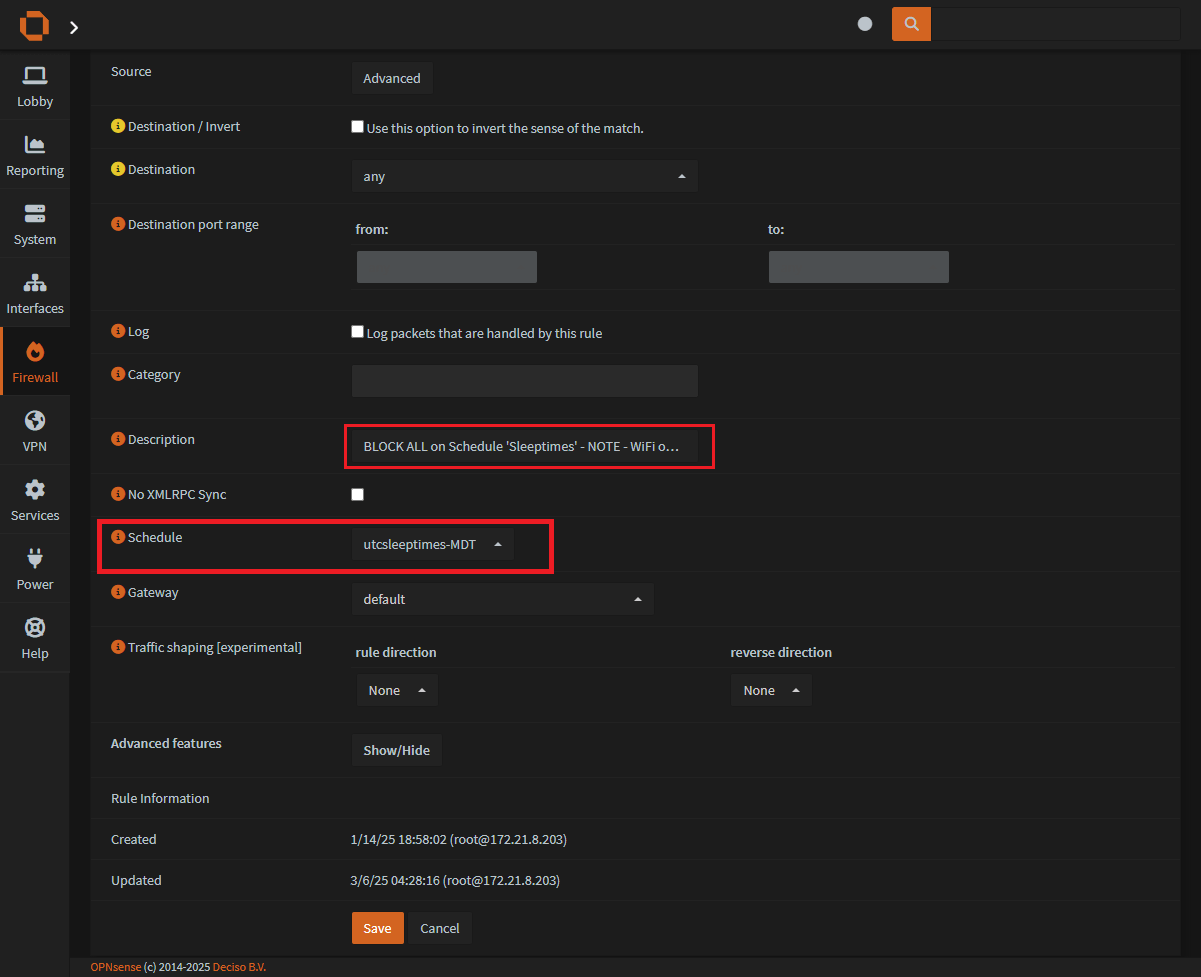
Scrolling down the page:
Description:
Defines the rule we're creatingSchedule:
Enter the name of the schedule you madeon Step 2.Save
Creating an OPNSense crontab action
If there isnt a crontab action already made for a service you need to modify, you can make it yourself.
In this example we’re going to be making an action for Wireguard, to start and stop the service.
OpenWRT custom Wireguard action cron schedule
Step 1: Let’s look at the script
We’re going to add a .conf file to OPNSense’s action.d directory for it’s services.
First let’s look at this script we’re going to make and stuff in this folder.
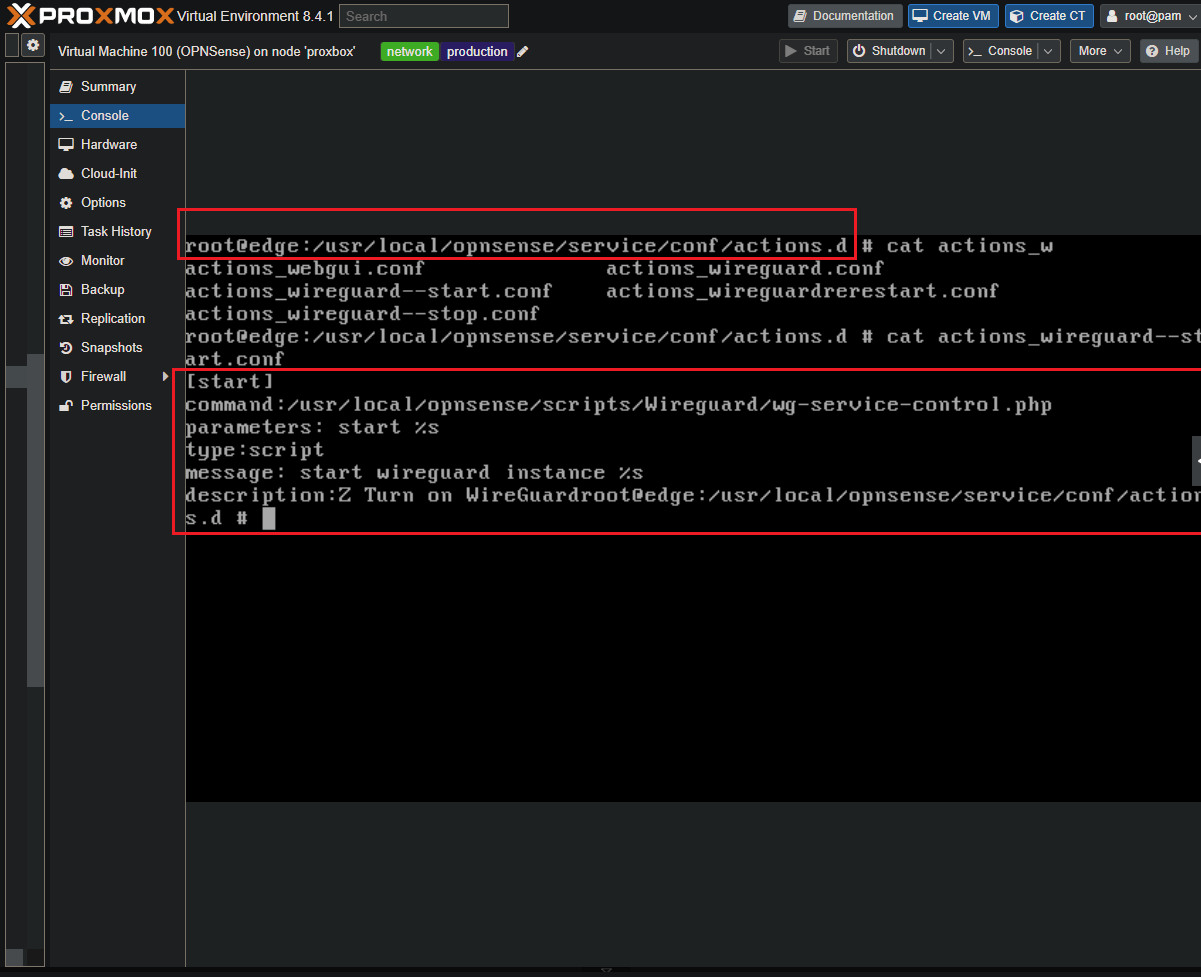
Looking from a console directly on OPNSense:
You can see the directory the file needs to be in:
/usr/local/opnsense/service/conf/actions.d/You can also see the output of the file:
actions_wireguard--start.conf
Step 2: SSH in and paste the files required
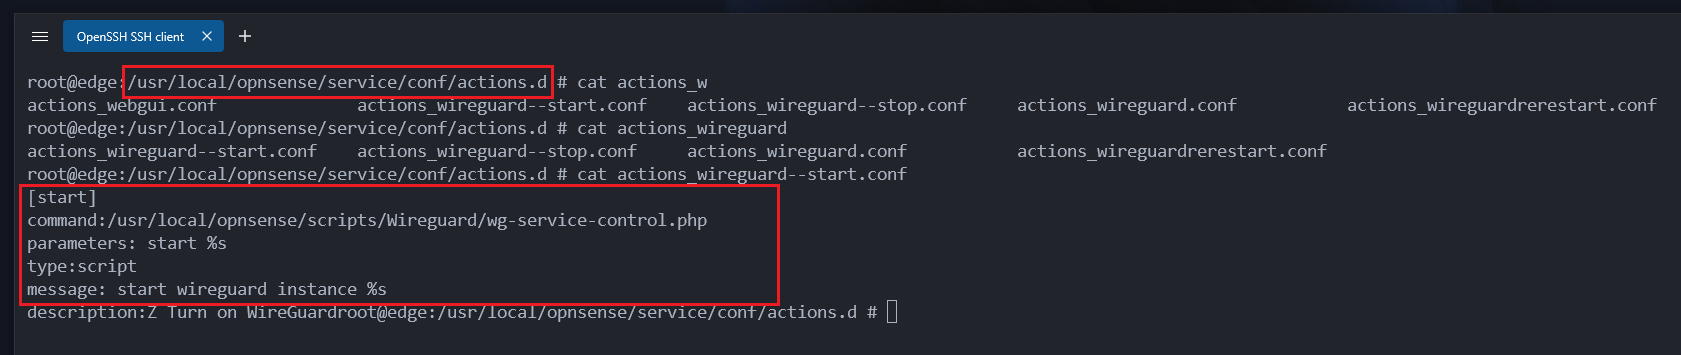
This may be difficult to read, so let’s SSH in and view this outside of a console terminal:
In the
/usr/local/opnsense/service/conf/actions.d/directoryBoth
actions_wireguard--start.confandactions_wireguard--stop.confare the files we’ll be making
actions_wireguard–start.conf
1
2
3
4
5
6
[start]
command:/usr/local/opnsense/scripts/Wireguard/wg-service-control.php
parameters: start %s
type:script
message: start wireguard instance %s
description:Z Turn on WireGuard
actions_wireguard–stop.conf
1
2
3
4
5
6
[stop]
command:/usr/local/opnsense/scripts/Wireguard/wg-service-control.php
parameters: stop %s
type:script
message: stop wireguard instance %s
description:Z Stop on WireGuard
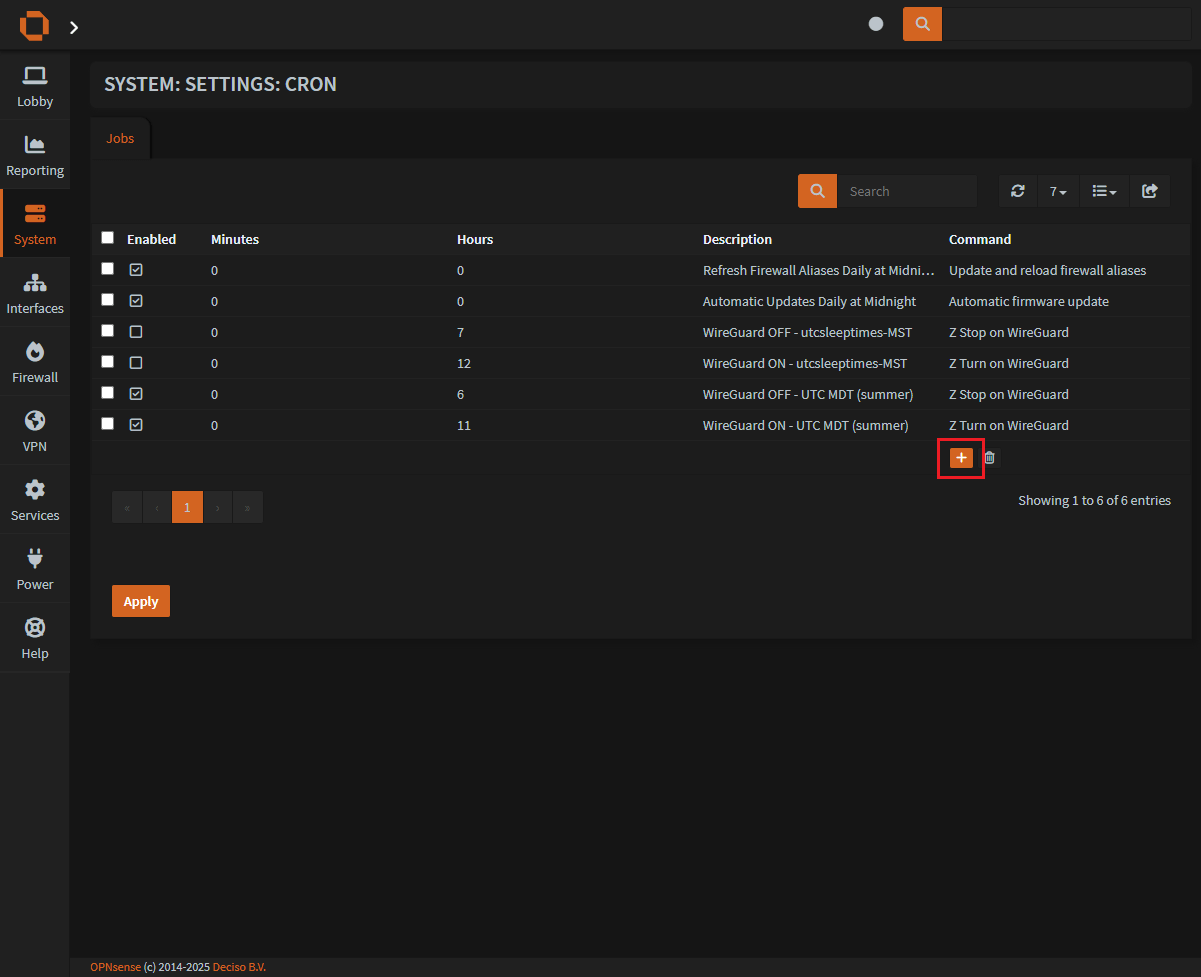
Step 3: Create actions in cron
With those files in place:
System > Settings > Cron
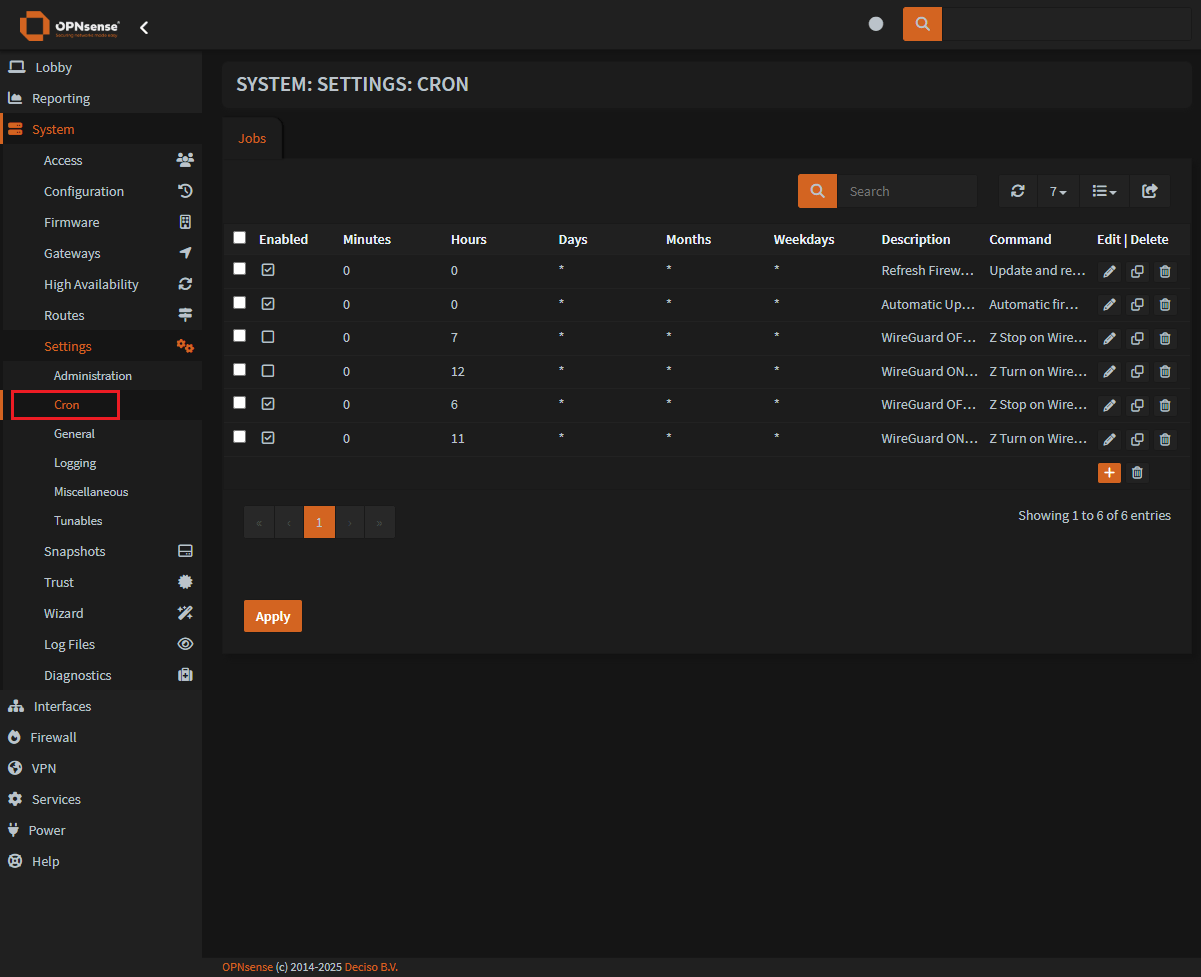
- Click on the
orange plusto add a new cron job
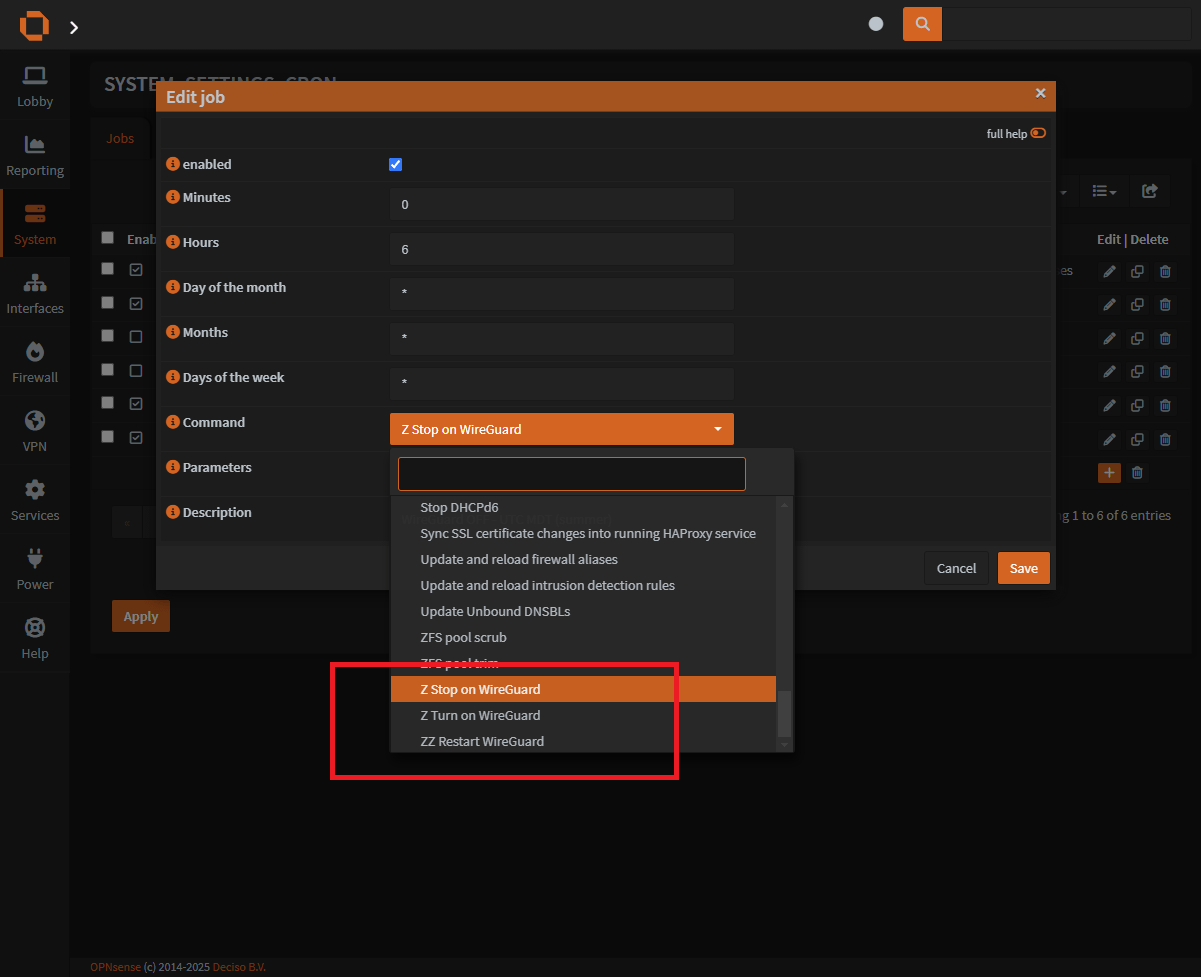
Step 4: Setup the cron job for Wireguard
Using cron time format
You will need to add a cronjob for both the onand the off of the Wireguard service.
This screenshot section only demonstrates adding a single service. Please remember to add both!
Enablethe checkbox for this jobYou can configure
MinutesandDays of the monthandMonthsandDays of the Weekthe same way as cron.- If you need any help with your cron syntax, check out https://crontab.guru.

Input the Wireguard interface
Please note, the action takes an input.
Under
Parametersyou will need to input your Wireguard interface- The first Wireguard interface you make is
wg0so try that if you dont know what to put.
- The first Wireguard interface you make is

Select the command to run
Commandwill be the description of the action in the directory actions.d you made earlier on Step 2.
Disable Web Application Login
Let’s say you want to restrict your web applications.
You want to disable the authorization of specific web application based on the time.
That’s what we’re here for.
Authentik behind Traefik
This demonstration uses Authentik to provide the authorization and custom script management that we need to make this work.
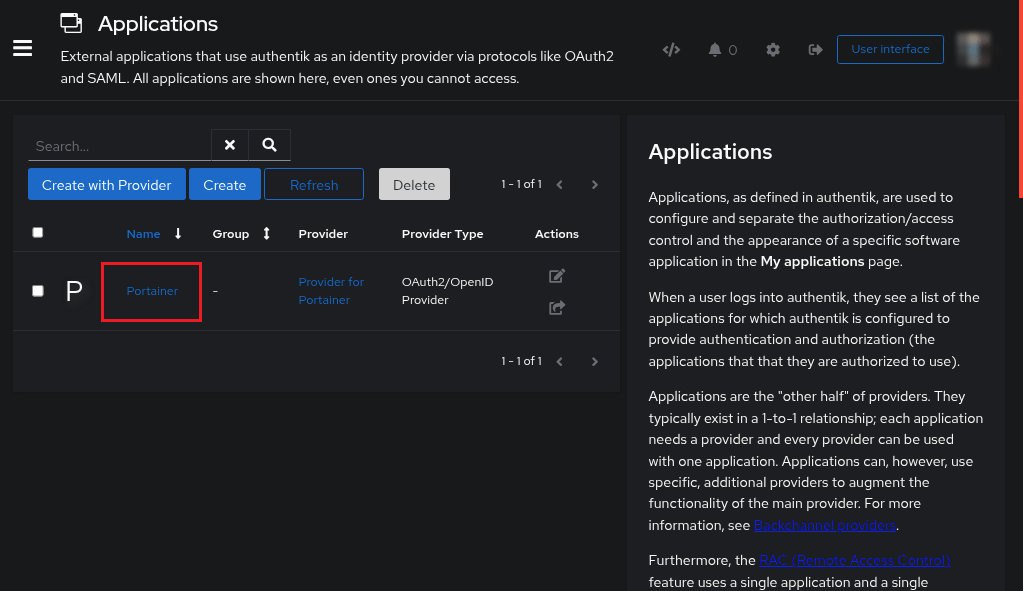
Step 1: Enter Application Policy Binding
Authentik has added a lot, this is one of those newer things - you can create and bind a policy to an application with one button.
This guide is written assuming you already have a working Application.
If you do not, please see: Ibracorp, Helge Klein, Jim’s Garage (YouTube)
Authentik Web UI > Applications > Applications
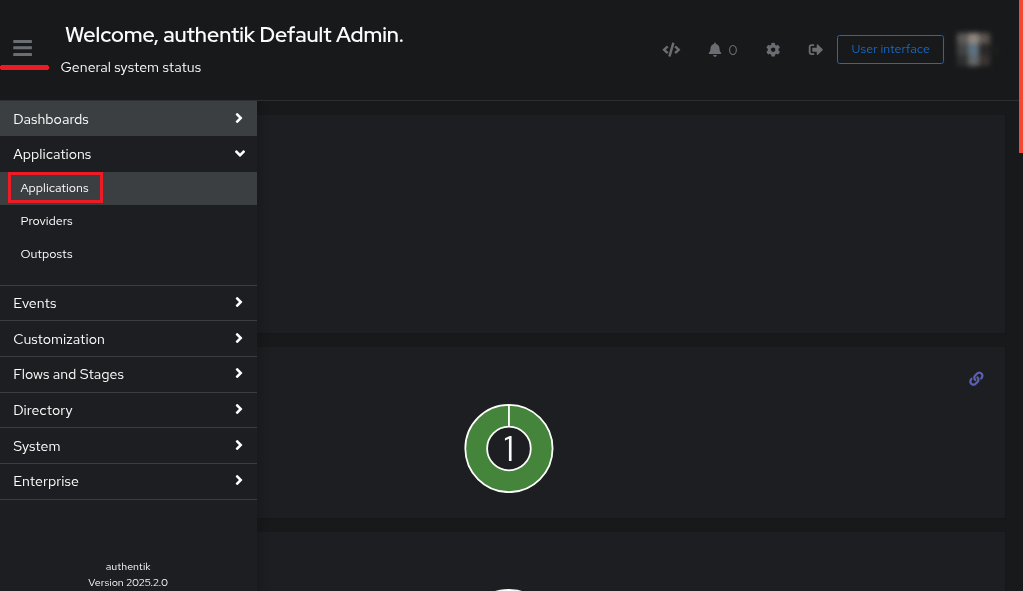
This example is going to use Portainer as the app requiring authentication before use.
- Click on your
APPNAMEor hit thepencil icon
Once on the new page, at the top
Click on
Policy/Group/User/Bindings
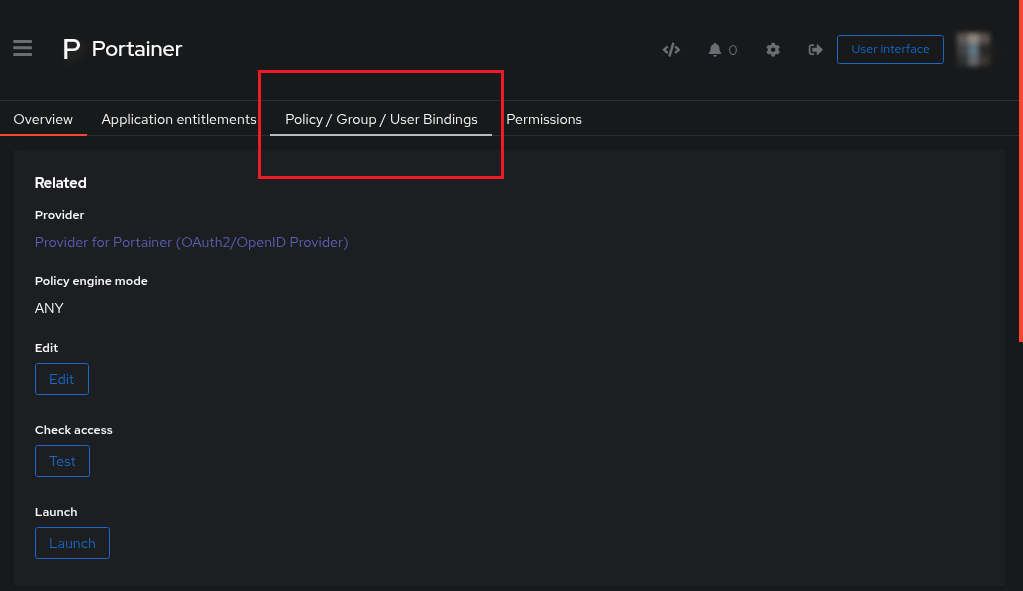
With the new tab open
Click on
Create and bind Policy

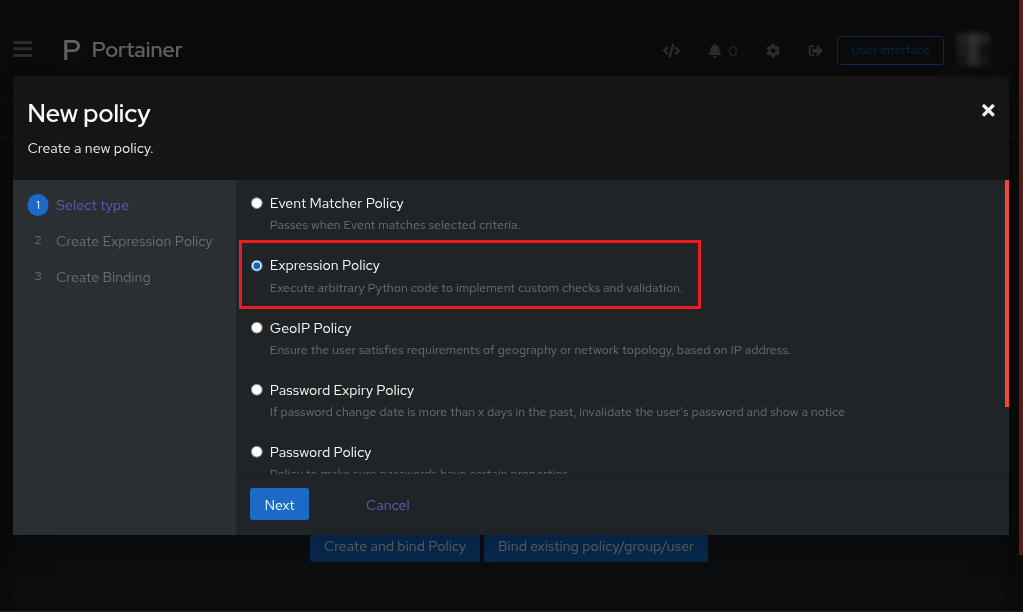
The
new policypage will appearClick on
Expression PolicyClick
Next
Think of the
nameyou want to use to identify this python script.This name will also appear on the
Authentik rejection pageas to why the user wasnt allowed in.In this example,
Sorry, Business Hours Only (8am - 5pm)
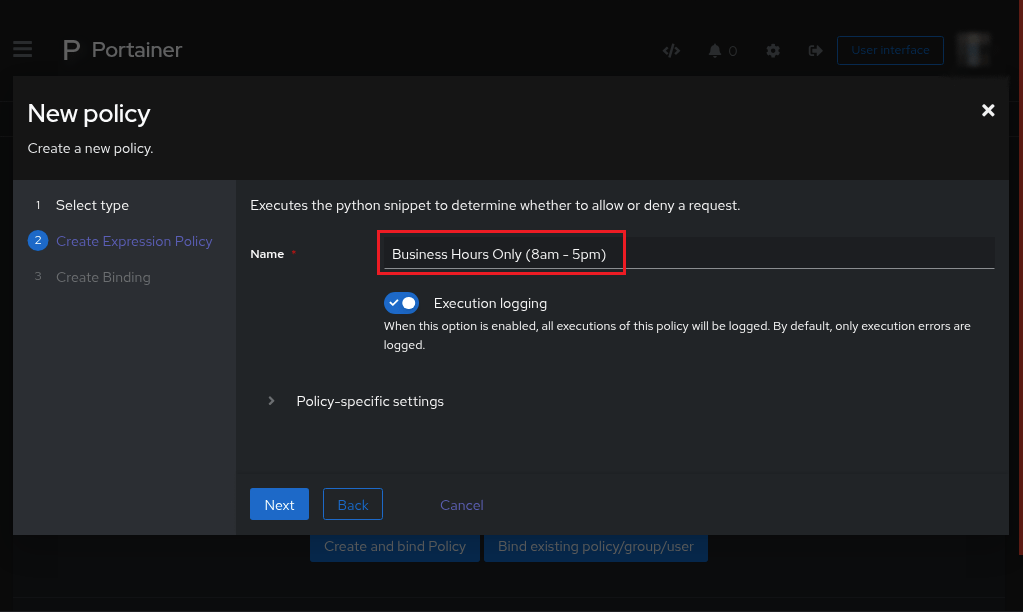
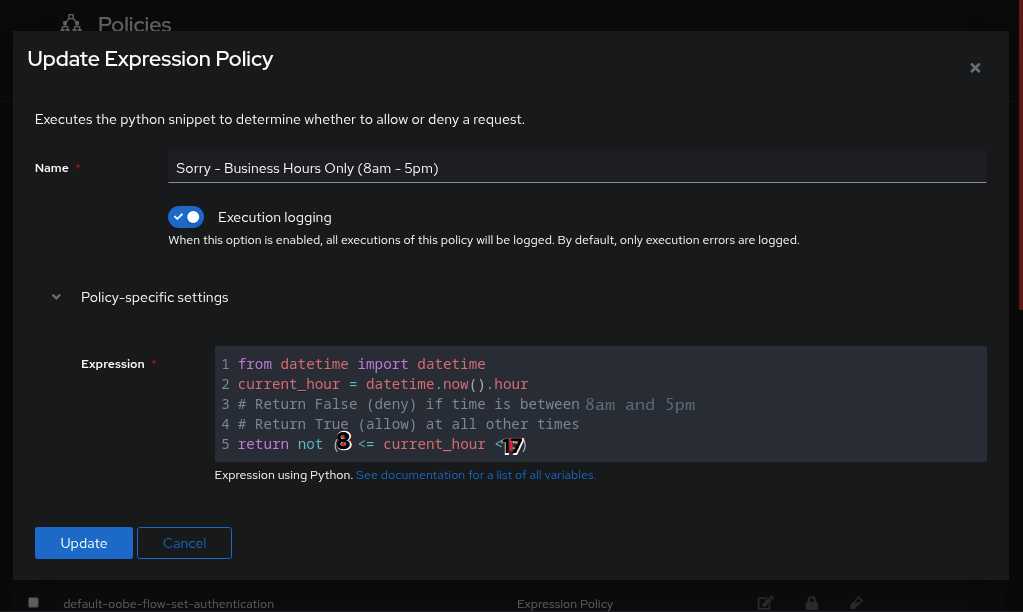
Under
Policy-specific settingsis where you can enter your pythonYou can put the Python code in the
Expressioncode block sectionThis example is going to use a Python expression to only allow logins during business hours (8am to 5pm) and block access at all other times:
1
2
3
4
5
from datetime import datetime
current_hour = datetime.now().hour
# Return True (allow) if time is between 8am and 5pm (17:00)
# Return False (deny) at all other times
return 8 <= current_hour < 17
This expression will:
Allow access between
8:00amand4:59pmDeny access from
5:00pmuntil7:59amthenext dayClick
Nextwhen done

The last page is for assigning the Policy, Enabling, Inverting, Ordering, and Assigning a Pass/Dont
Policyshould be whatever policy name you write in earlierEnabledthis should be checkedScroll to the bottom
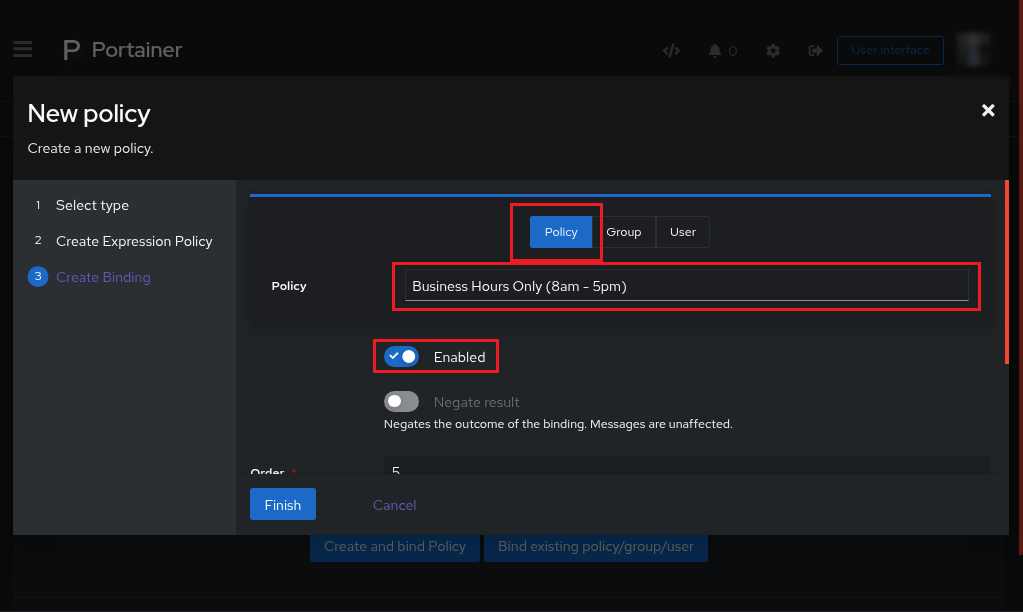
We dont want people to login if the current_hour is before 8am or after 5pm.
Failure resultshould bedont pass.Click
Finish

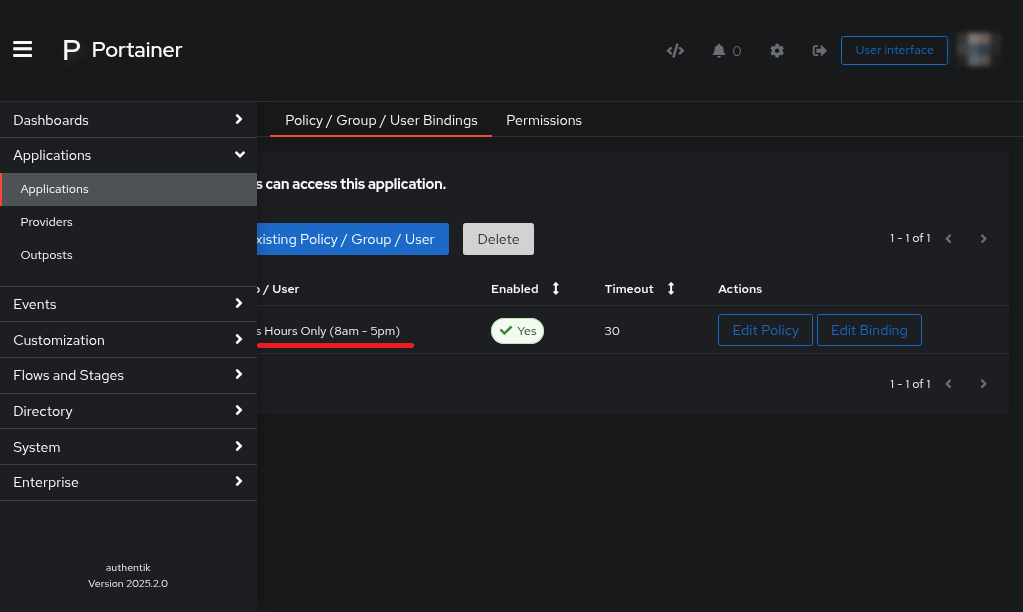
You can review what you just created on the page you arrived at earlier
Applications > Applications > Application_Name > Policy / Group / User BindingsClick on
Edit Binding, just for good fun.
Just to test out our rule, as it’s still business hours where I’m at…
Edit the Binding and Update it to Invert the Result
Click
Negate resultClick
Update

- Now try and use Authentik login to your test application.
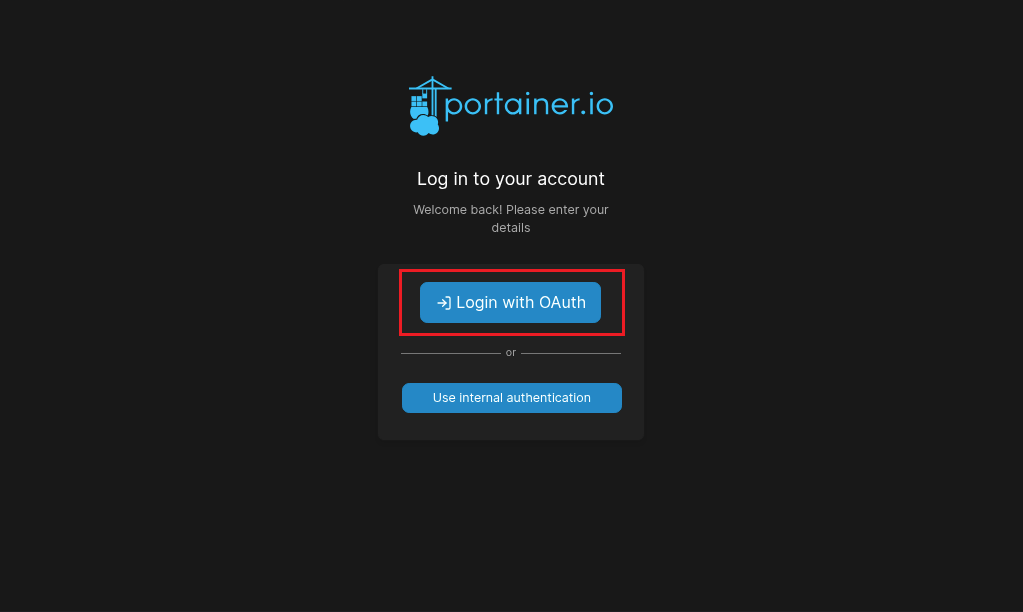
This page is blocking us from logging in!
The page is displaying
Policy binding 'Binding from Portainer to PolicyThen in the same line it lists our Expression Policy’s name used to identify the python script envoking this rule
Sorry - Business Hours Only (8am - 5pm)The value returned is then displayed for the user
returned result 'False'

But none of this is real if we cant prove it to our boss.
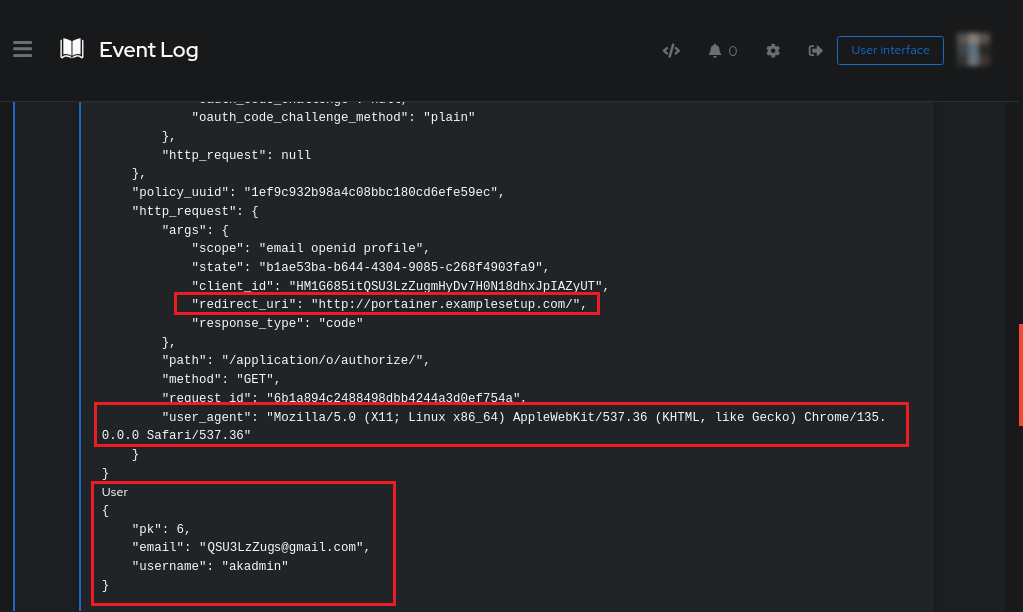
Events > Logs

Once one the page for event logs, we need to search for the failed login.

If you’ve located the offending login, hit the arrow down button to drill down and expand the action.
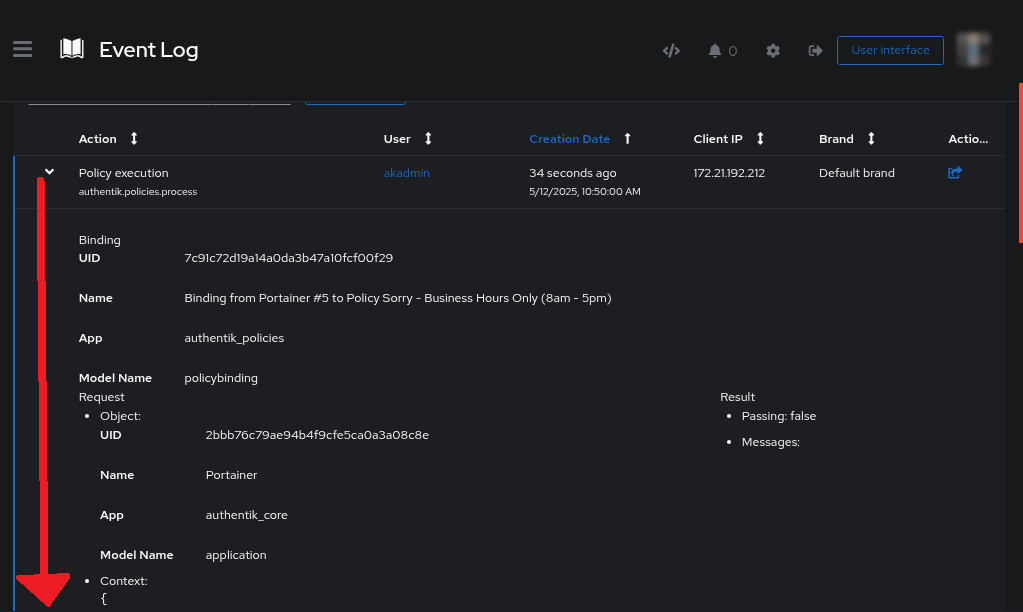
Here is the information of the bad person. Oh no!!!
The website they tried to sign in to
The device they were using
The identity of the person and the account used
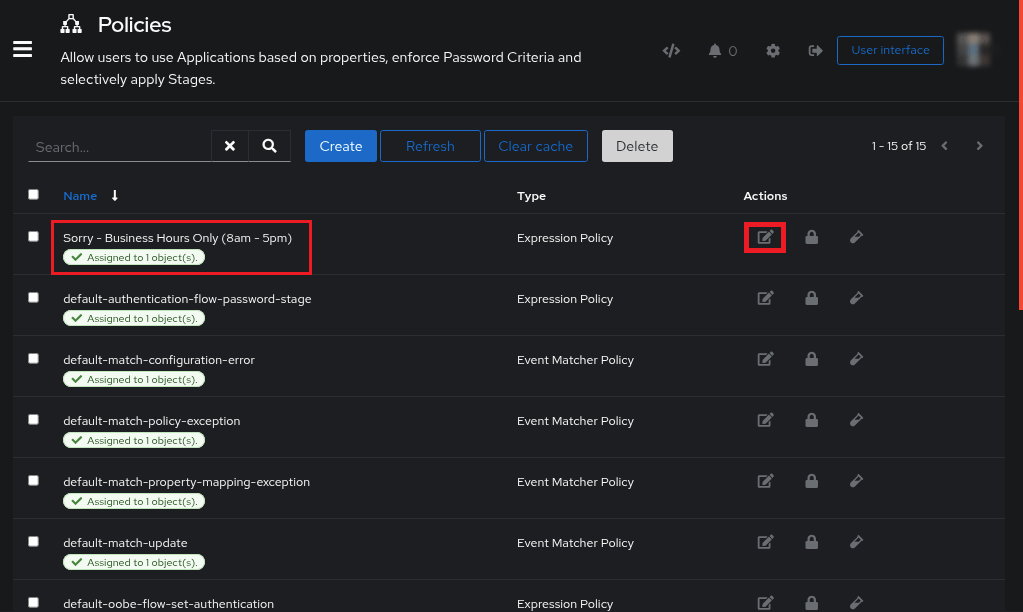
You can view and edit the Policy you made, incase you need to change the hours
Customization > Policies

To edit the policy:
Find the policy you want to edit
Click on the
pencil icon
Here you can adjust the policy in any way you want,
- In this example, adjust the time of day between 8am and 5pm
Congratulations
For sucessfully making it to the end, may I present to you
Welcome to the bonus stage
Rotate your Wifi SSID Script!
The SSID-rotate-script.sh is below…
This script would be called by cron on your OpenWRT access point.
This SSID changes to a pre-set list. Most begin with emoji.
The PSK used is pulled from a Voltare novel. No random strings.
You are emailed the SSID and password.
Please, please - specify your current Wifi SSIDs that should not be changed by this script!!!!
It can run daily, weekly, monthly, whatever. There are a limited amount of SSIDs, but the PSK it generates should be almost endless…
This is for extra fun! Good luck cracking a rotating Wifi.
Putting the script together
You will need to put the script:
Place this script in the directory:
/usr/bin/With the name:
SSID-rotate-script.shNow you can run Cron on your AP to access this script:
10 06 * * * /usr/bin/SSID-rotate-script.sh
Changes required in the script to function correctly
You must modify the script to work for your needs, most of this is fake data
email_recipients:
keeptrackofSSID/PSKchanges@gmail.comBREVO_API_KEY:
xkeysib-1f922eVzzzxxxxBREVO_FROM (email):
wifi@dkim-my-domain.comstatic_ssids (your SSIDs seperated by a pipe):
So Many|WifiNameHere|_W‗i=️F‗i_|AllTheWifiMinimum and maximum length for SSIDs (this determines password complexity)
MINLEN:
24MAXLEN:
48
I normally take the min and double it to find the max, but you can decide.
Script to Rotate SSIDs on OpenWRT
1
2
3
4
5
6
7
8
9
10
11
12
13
14
15
16
17
18
19
20
21
22
23
24
25
26
27
28
29
30
31
32
33
34
35
36
37
38
39
40
41
42
43
44
45
46
47
48
49
50
51
52
53
54
55
56
57
58
59
60
61
62
63
64
65
66
67
68
69
70
71
72
73
74
75
76
77
78
79
80
81
82
83
84
85
86
87
88
89
90
91
92
93
94
95
96
97
98
99
100
101
102
103
104
105
106
107
108
109
110
111
112
113
114
115
116
117
118
119
120
121
122
123
124
125
126
127
128
129
130
131
132
133
134
135
136
137
138
139
140
141
142
143
144
145
146
147
148
149
150
151
152
153
154
155
156
157
158
159
160
161
162
163
164
165
166
167
168
169
170
171
172
173
174
175
176
177
178
179
180
181
182
183
184
185
186
187
188
189
190
191
192
193
194
195
196
197
198
199
#!/bin/ash


# === Pre-check Start ===

# Ensure /usr/bin/ exists and silently change directory
mkdir -p /usr/bin/ 2>/dev/null
cd /usr/bin/ || exit 1

# === Pre-check End ===


# === CONFIG START ===

# List of email recipients for SSID/PSK updates:
email_recipients="
keeptrackofSSID/PSKchanges@gmail.com
"

# Brevo API details (set your actual values):
BREVO_API_KEY="xkeysib-1f922eVzzzxxxxxyyaaaabccccdddeeee"
BREVO_FROM="wifi@webdkim.com"  # Brevo sender email

# Static SSIDs to keep unchanged
static_ssids="So Many|WifiNameHere|_W‗i=️F‗i_"

# File names of the files to store
SSID_filename="SSID-list-of-names.txt"
PSK_filename="SSID-psk-by-voltaire.txt"

### !!IMPORTANT!! ####
# Minimum and maximum length for SSIDs (this determines password complexity)
export MINLEN=24
export MAXLEN=48
export NUMLINES=$(wc -l < "$SSID_filename")
## OK YOU READ THAT ##

# === CONFIG END ===


# === File Check Start ===

# Check if files exist, otherwise download them
[ ! -f "$SSID_filename" ] && wget -q -O "$SSID_filename" "https://pastebin.com/raw/JkA9KYeM"
[ ! -f "$PSK_filename" ] && wget -q -O "$PSK_filename" "https://www.gutenberg.org/cache/epub/19942/pg19942.txt"

# === File Check End ===


# === Function to modify text into valid random sections at designated length ===
mkfifo ssid_pipe filtered_pipe

# Write SSIDs to pipe
head -n "$NUMLINES" "$SSID_filename" > ssid_pipe &

# Write filtered lines to pipe
awk -v minlen="$MINLEN" -v maxlen="$MAXLEN" '
  /^[[:space:]]*$/ {next}        # Skip empty lines
  /   / {next}                   # Skip lines with triple spaces (likely headers or junk)
  {
    line = $0
    if (length(line) > maxlen) {
      trimmed = substr(line, 1, maxlen)
      last_space = 0
      for (i = maxlen; i > 0; i--) {
        if (substr(trimmed, i, 1) == " ") {
          last_space = i
          break
        }
      }
      if (last_space > 0) {
        line = substr(trimmed, 1, last_space - 1)
      } else {
        line = trimmed
      }
    }
    if (length(line) >= minlen) print line
  }
' "$PSK_filename" | \
awk 'BEGIN {srand()} {print rand() "\t" $0}' | \
sort -k1,1n | \
cut -f2- | \
head -n "$NUMLINES" > filtered_pipe &

# Use awk to merge SSIDs and filtered PSKs
list=$(awk '{ getline line2 < "filtered_pipe"; print $0 ":" line2 }' ssid_pipe)

# Remove named pipes from memory
rm ssid_pipe filtered_pipe

# Shuffle the list
shuffled_list=$(echo "$list" | awk 'BEGIN{srand()} NF {print rand(), $0}' | sort -k1,1n | cut -d' ' -f2-)
iface_total=$(uci show wireless | grep '=wifi-iface' | wc -l)
logger -t ssid-rotate "=== Starting SSID/PSK rotation ==="

# === Function to modify text into valid random sections at designated length End ===


# === Send email function used later ===

# Send Email through Brevo
send_brevo() {
  subject="$1"
  body="$2"

  # Loop over email recipients
  for email in $email_recipients; do
    [ -z "$email" ] && continue

    # Send email using Brevo API
    curl -s -X POST "https://api.brevo.com/v3/smtp/email" \
      -H "api-key: $BREVO_API_KEY" \
      -H "Content-Type: application/json" \
      -d @- << EOF
{
  "sender": {
    "email": "$BREVO_FROM"
  },
  "to": [
    {
      "email": "$email"
    }
  ],
  "subject": "$subject",
  "htmlContent": "<html><body><pre>$body</pre></body></html>"
}
EOF
    logger -t ssid-rotate "[EMAIL] Sent credentials to '$email'"
    echo ""
  done
}

# === End send email function ===


# === Write the email and set the correct SSID/PSK ===

# Initialize body to collect SSID:PSK pairs
body="The following WiFi SSID/PSK pairs were updated:\n\n"

# Loop through shuffled SSIDs and apply
index=0
echo "$shuffled_list" | while IFS= read -r line; do
  ssid_val=$(echo "$line" | cut -d':' -f1)
  psk_val=$(echo "$line" | cut -d':' -f2)

  iface="wireless.@wifi-iface[$index]"
  current_ssid=$(uci get "$iface.ssid" 2>/dev/null)

  echo "$current_ssid" | grep -qE "^($static_ssids)$"
  if [ $? -eq 0 ]; then
    logger -t ssid-rotate "[SKIP] $iface: Static SSID '$current_ssid'"
  else
    logger -t ssid-rotate "[UPDATE] $iface: Setting SSID='$ssid_val'"

    # Update SSID/PSK in UCI
    uci set "$iface.ssid=$ssid_val"
    uci set "$iface.key=$psk_val"
    echo -e "\n--------------------\nSSID SET TO:    $iface.ssid=$ssid_val"
    echo -e "--------------------\nPassword is:    $iface.key=$psk_val\n========================"

    # Append updated SSID:PSK to the body (write to temporary file)
    echo "\nSSID:  $ssid_val\nPassword:  $psk_val\n" >> /tmp/ssid_update_body.txt
  fi

  index=$((index + 1))
  [ "$index" -ge "$iface_total" ] && break
done


### NOTE: EDIT ANY TEXT IN THE EMAIL HERE ###
# Read the accumulated body from the temporary file
body="The following WiFi SSID/PSK pairs were updated:\n\n$(cat /tmp/ssid_update_body.txt)"

# Send the entire list of SSID:PSK via Brevo
send_brevo "[WiFi] All Updated SSID Credentials" "$body"

# === End writing the email and setting the correct SSID/PSK ===


# === Final send off

# Cleanup temporary file
rm -f /tmp/ssid_update_body.txt

# Finish setting config
uci commit wireless
wifi reload

# Log the completion of tasks
logger -t ssid-rotate "=== SSID/PSK rotation complete ==="

# === Goodbye
Have fun with some bonus on that extra fun!
I can see someone doing something really neat with this script….
Daily Challenges!!!!
Examples Included!
I have included some examples of Question:Answer SSID:PSK you can use to make your own list. You dont need Voltare!
Difficult Math SSID Puzzle Set (SSID → PSK)
These are some fun Math problems you may have seen around. SSID = math puzzle, and PSK = solution. Perfect for nerd households, hacker cafés, math classrooms, or just flexing on coworkers.
| SSID | PSK (Wi-Fi Password) | Explanation |
|---|---|---|
∫₀^2 x² dx = ? | 8/3 | ∫₀² x² dx = x³/3 = 8/3 |
e^(iπ) + 1 = ? | 0 | Euler’s Identity: e^(iπ) + 1 = 0 |
limₙ→∞ (1+1/n)ⁿ = ? | e | The limit defines the number e |
φ = (1+√5)/2 = ? | 1.618 | Golden ratio (rounded) |
d/dx(x³+3x²+2x) = ? | 3x²+6x+2 | Derivative |
∑ₙ₌₁^4 n² = ? | 30 | 1²+2²+3²+4² = 30 |
sin(π/2) = ? | 1 | Exact trig value |
gcd(48,18) = ? | 6 | Greatest common divisor |
101 in decimal = ? | 5 | Binary 101 = decimal 5 |
ln(e³) = ? | 3 | Log base e |
7! = ? | 5040 | 7×6×5×4×3×2×1 = 5040 |
2⁵ × 3² = ? | 288 | Powers multiplied |
∫₀^π sin(x) dx = ? | 2 | Area under sin(x) from 0 to π |
Usage Idea:
| What You Set | Value |
|---|---|
| SSID | ∫₀^2 x² dx = ? |
| PSK (password) | 8/3 |
Guests will see the network name as the challenge — and only get access if they solve it. 🤓
Easier Math SSID challenges
Here’s a curated set of High School Math SSID challenges — solvable with algebra, geometry, or basic precalc. The SSID is the math problem, and the PSK (password) is the correct answer. Great for classrooms, nerd households, or just math-ing up your network.
| SSID | PSK (Wi-Fi Password) | Explanation |
|---|---|---|
x² - 9 = 0 | 3 | x = ±3 → Pick positive real root |
log₁₀(100) = ? | 2 | log base 10 of 100 |
√(49) = ? | 7 | Square root of 49 |
Area of circle, r=3 | 28.27 | πr² = π·9 ≈ 28.27 |
Slope: (2,3),(4,7) | 2 | (7–3)/(4–2) = 4/2 = 2 |
Distance: (0,0)-(3,4) | 5 | √(3²+4²) = 5 (Pythagorean triple) |
x% of 200 = 50 | 25 | 25% of 200 is 50 |
Volume cube, s=5 | 125 | V = s³ = 5³ = 125 |
y = mx + b, m=2, b=3 | y=2x+3 | Plug into slope-intercept form |
x/2 = 8 | 16 | Multiply both sides by 2 |
lcm(6,8) = ? | 24 | Smallest common multiple |
Perimeter, square s=4 | 16 | 4×s = 16 |
a² + b² = c², a=5, b=12 | 13 | 5² + 12² = 169 → √169 = 13 |
Solve: 2x+1=9 | 4 | 2x = 8 → x = 4 |
Tips for Use:
- SSID: set as the math challenge
- Password (PSK): set as the correct answer, exactly (numbers, decimals, etc.)
- Optional fun: allow hint mode via captive portal (showing formula or help if they click)
Logic & Word Problem Wi-Fi SSIDs
Let’s go full Logic & Word Problems mode. These are clever, short SSID math puzzles that read like brain teasers — and the Wi-Fi password (PSK) is the answer. All under 32 characters. Perfect for math lovers, escape room vibes, or just making people work to connect.
| SSID (Wi-Fi Name) | Password (PSK) | Explanation |
|---|---|---|
Twice x = 10 | 5 | 2x = 10 → x = 5 |
Half of 18 | 9 | 18 ÷ 2 = 9 |
3 ppl share $18 equally | 6 | Each gets $6 |
Next prime after 11 | 13 | 13 is next prime |
30 cows + 28 chickens = ? | 2 | “twenty ate chickens” (30 total - 28 = 2 cows didn’t eat chickens) |
Mom has 4 kids: NE SE SW ? | NW | Compass directions — Northwest |
If 2 pens cost $4, 1 = ? | 2 | $4 ÷ 2 = $2 per pen |
3 cats catch 3 mice in 3min. How many in 9min? | 9 | 1 cat catches 1 mouse in 3min → 3 cats = 3 mice every 3min → 9 in 9min |
What’s odd about even? | number | Wordplay: it’s a number |
Word for 0 factorial | 1 | 0! = 1 |
You see 9 birds. You shoot 1. How many left? | 0 | They all flew away! |
I am a number. Double me is 10 | 5 | Self-evident |
An hour ago it was 2x as late | 9 | It’s 10 now. At 9 it was twice as late as 8 |
You buy $10 socks, pay $20, get $10 change. Store’s profit? | 10 | You paid $10 in total |
You + me = ? | we | Logic meets cute wordplay |
An odd number. Remove 1 letter = even | seven | Remove the “s” — it becomes “even”! |
Dad Joke SSID Challenge
Welcome to the Wi-FI of Dad — a wholesome zone where your SSID is a pun, riddle, or dad joke, and the PSK (password) is the groan-worthy punchline.
| SSID (Wi-Fi Name) | Password (Punchline) | Explanation |
|---|---|---|
Why can't eggs tell jokes? | They crack up | Classic pun |
What's brown and sticky? | A stick | Groan… |
I only know 25 letters... | I don't know Y | Get it? Why |
Why did Wi-Fi break up? | No connection | Relationship status: buffering |
Can February March? | No, but April May | Wordplay calendar joke |
Why don't skeletons fight? | No guts | Physically impossible |
What do you call fake pasta? | Impasta | Imposter + pasta |
What’s a fish with no eyes? | Fsh | No “i” in fish |
What's orange and sounds like a parrot? | A carrot | Carrot… parrot… just… yep. |
Want to hear a roof joke? | Never mind, over your head | Classic dad delivery |
Time traveler joke? | You didn't like it | Meta punchline |
I’d tell a construction joke… | Still working on it | Timeless |
I told my dog a joke | He pawsed | Woof-worthy pun |
Wi-Fi went to therapy | Too many issues | Signal strength is emotional now |
Broke up with my router | Lost the spark | ⚡📶💔 |
What's a cow with no legs? | Ground beef | Mooving on |
What’s Beethoven’s favorite fruit? | Ba-na-na-na! | Sing it like the symphony |
I used to be a banker... | Lost interest | Classic career pun |
Change your WAN IP with OPNsense every so often
Why not change your IP every morning as well?
I have a script that will do that exact same thing, for OPNsense!
What does this script do?
This requires you to reboot your upstream provider’s device. Cable modem, whatever.
This script will not do that!!
Your reboot has to be done AFTER you have downloaded the required oui.txt
There are two sections about timings, check them out - see if they need adjusted.
How do I use this script?
Make sure
SLEEPTIME_BEFORE_MODEM_REBOOTis long enough that you can power cycle your modem, but it doesnt completly sync.Double check
SLEEPTIME_BEFORE_MODEM_DHCPis long enough for your modem finish powering on and syncing before attempting DHCP.Run script
Wan Mac Address Auto Spoof
1
2
3
4
5
6
7
8
9
10
11
12
13
14
15
16
17
18
19
20
21
22
23
24
25
26
27
28
29
30
31
32
33
34
35
36
37
38
39
40
41
42
43
44
45
46
47
48
49
50
51
52
53
54
55
56
57
58
59
60
61
62
63
64
65
66
67
68
69
70
71
72
73
74
75
76
77
78
79
80
81
82
83
84
85
86
87
88
89
90
91
92
93
94
95
96
97
98
99
100
101
102
103
104
105
106
107
108
109
110
111
112
113
114
115
116
117
118
119
120
121
122
123
124
125
126
127
128
129
130
131
132
133
134
135
136
137
138
139
140
141
142
143
144
145
146
147
148
149
150
151
152
153
154
155
156
157
158
159
160
161
162
163
164
165
166
167
168
169
170
171
172
173
174
175
176
177
178
179
180
181
182
183
184
185
186
187
188
189
190
191
192
193
194
195
196
197
198
199
200
201
202
203
204
205
206
207
208
209
210
211
212
213
214
215
216
217
218
219
220
221
222
223
224
225
226
227
228
229
230
231
232
233
234

#!/bin/csh

# -----------------------------------------------------------------------------
# WAN MAC Address Spoofing Script
# -----------------------------------------------------------------------------
# This script automates the process of changing (spoofing) your router's WAN
# MAC address by editing config.xml and restarting the network interface.
# It:
#   1. Downloads the IEEE OUI (Organizationally Unique Identifier) list if needed
#   2. Randomly picks a valid OUI and generates a new MAC address
#   3. Edits <spoofmac/> in config.xml under the <wan> interface with the new MAC
#   4. Restarts the WAN interface to apply the change
# Use case: Circumventing ISP restrictions, resetting DHCP leases, or privacy.
# -----------------------------------------------------------------------------


# Use config.xml as the filename, you can change if you'd like to test the script and not wreck your router
set filename = "config.xml"

# Timing variables to coordinate modem/router reboot and DHCP re-registration
## SLEEPTIME_BEFORE_MODEM_REBOOT is the sleep time before you take down your internet, and reboot your modem, make sure your modem
## doesnt come back up during this sleep time (so keep it short and try and time your reboot/powercycle and this script running together).
set SLEEPTIME_BEFORE_MODEM_REBOOT = "30"   # Wait before rebooting modem (seconds)

## This is the amount of time it takes your router to reboot and become in-sync/registered/online with the network.
set SLEEPTIME_BEFORE_MODEM_DHCP = "120"    # Wait for router to sync after modem reboot (seconds)

# Set your interface you would like to automatically reboot at the end of the script.
## If you do not uncomment/configure the WAN_INTERFACE below, it will be set to whatever interface is marked as (wan) by OPNsense
# set WAN_INTERFACE = "igb1"
if (! $?WAN_INTERFACE) then
    setenv WAN_INTERFACE `ifconfig | awk '/\(wan\)/ { if (prev ~ /^[^:]+:/) { split(prev, a, ":"); print a[1] } } { prev = $0 }'`
endif


# -----------------------------------------------------------------------------
# OUI List Download
# -----------------------------------------------------------------------------
# The OUI list is needed to generate a valid MAC address prefix.
# Download it if it doesn't exist.
if (! -f oui.txt) then
    logger "[SPOOFWANMAC] Downloading oui.txt..."
    curl -s -o oui.txt https://standards-oui.ieee.org/oui/oui.txt
    if ($status != 0) then
        logger "[SPOOFWANMAC] Failed to download OUI list"
        exit 1
    endif
else
    logger "[SPOOFWANMAC] oui.txt already exists - this script has been ran before. Nice."
endif

# Wait before proceeding, giving time for downloads or manual modem reboot
sleep $SLEEPTIME_BEFORE_MODEM_REBOOT;


#########################################
####     I N S T R U C T I O N S     ####
#######        b e l o w        #########
##   Send your Zigbee  off/on command  ##
##   and power cycle your modem right  ##
##     before you run this section     ##
#########################################


logger "[SPOOFWANMAC] Using file $filename"

# Check if config.xml exists
if (! -e $filename) then
    echo "File $filename does not exist."
    exit 1
endif

# If the OUI list did not download above, you've lost internet, and the file is not present -- fullstop.
if (! -f oui.txt) then
    logger "[SPOOFWANMAC] Downloading oui.txt..."
    curl -s -o oui.txt https://standards-oui.ieee.org/oui/oui.txt
    if ($status != 0) then
        logger "[SPOOFWANMAC] Failed to download OUI list"
        exit 1
    endif
else
    logger "[SPOOFWANMAC] oui.txt is present, continue."
endif


# -----------------------------------------------------------------------------
# Generate a Random Valid MAC Address
# -----------------------------------------------------------------------------
# Extract all OUI prefixes (first 3 bytes of MAC) from oui.txt,
# pick one at random, and append 3 random bytes to complete the MAC.

set nonomatch

# $$ is the script's PID, making the temp file unique
set tempfile = "oui_temp_$$"

# Extract OUI prefixes, remove dashes, and store in tempfile
grep -E '^[0-9A-F]{2}-[0-9A-F]{2}-[0-9A-F]{2}' oui.txt | cut -d' ' -f1 | tr -d '-' > $tempfile

# Count number of OUIs
set count = `wc -l < $tempfile`
logger "[SPOOFWANMAC] OUI count is $count"
if ($count == 0) then
    logger "[SPOOFWANMAC] No valid OUIs found"
    rm -f $tempfile
    exit 1
endif

# Pick a random line from the OUI list
set randline = `expr $$ % $count + 1`
logger "[SPOOFWANMAC] Random line to pick is $randline"

set OUI = `sed -n "${randline}p" $tempfile`
logger "[SPOOFWANMAC] Picked OUI is $OUI"
rm -f $tempfile

if ("$OUI" == "") then
    logger "[SPOOFWANMAC] Failed to extract OUI"
    exit 1
endif

# Format OUI as XX:XX:XX:
set OUIformatted = `echo $OUI | sed 's/../&:/g' | sed 's/:$//'`

# Generate 3 random bytes for the device-specific part of the MAC
set DEVICE = `od -An -N3 -tx1 /dev/urandom | tr -d ' \n' | sed 's/../:&/g'`

# Concatenate to make the full MAC address
set MACADDR = "${OUIformatted}${DEVICE}"
logger "[SPOOFWANMAC] Final MACADDR is $MACADDR"


# -----------------------------------------------------------------------------
# Edit config.xml: Replace <spoofmac/> under <wan> with new MAC address
# -----------------------------------------------------------------------------

# Prepare temporary file for output
set tmpfile = "${filename}.tmp"
set found_interfaces = 0
set found_wan = 0
set replaced = 0
set lineno = 0
set post_wan_lines = 0

# Clear the temp file
cat /dev/null > $tmpfile

# Read config.xml line by line to find the <wan> interface and replace <spoofmac/>
foreach line ("`cat $filename`")
    @ lineno++
    if ($found_interfaces == 0) then
        # Look for the <interfaces> section
        echo "$line" | grep -q "<interfaces>"
        if ($status == 0) then
            logger "[SPOOFWANMAC] Found <interfaces> at line $lineno"
            set found_interfaces = 1
        endif
        echo "$line" >> $tmpfile
    else if ($found_wan == 0) then
        # Look for the <wan> interface
        echo "$line" | grep -q "<wan>"
        if ($status == 0) then
            logger "[SPOOFWANMAC] Found <wan> at line $lineno"
            set found_wan = 1
        endif
        echo "$line" >> $tmpfile
    else
        # After finding <wan>, look for <spoofmac/> or </spoofmac> to replace
        @ post_wan_lines++
        if ($post_wan_lines <= 5) then
            logger "[SPOOFWANMAC] Line after <wan> ($post_wan_lines): $line"
        else if ($post_wan_lines % 1000 == 0) then
            # Optionally log progress every 1000 lines
#            logger "[SPOOFWANMAC] $post_wan_lines lines processed after <wan>..."
        endif
        if ($replaced == 0) then
            # Replace <spoofmac/> or </spoofmac> with the new MAC address
            echo "$line" | grep -Eq "<spoofmac/>|</spoofmac>"
            if ($status == 0) then
                logger "[SPOOFWANMAC] Found <spoofmac/> at line $lineno, replacing with new MAC"
                echo "<spoofmac>$MACADDR</spoofmac>" >> $tmpfile
                set replaced = 1
            else
                echo "$line" >> $tmpfile
            endif
        else
            echo "$line" >> $tmpfile
        endif
    endif
end

# If replacement was successful, save the changes; otherwise, clean up
if ($replaced == 1) then
    mv $tmpfile $filename
    logger "[SPOOFWANMAC] Success. MAC Address for WAN interface has been changed."
else
    rm -f $tmpfile
    logger "[SPOOFWANMAC] End of file reached after <wan> at line $lineno, <spoofmac/> not found."
    logger "[SPOOFWANMAC] Condition not met: replacement not done."
endif


# -----------------------------------------------------------------------------
# Restart WAN Interface to Apply New MAC Address
# -----------------------------------------------------------------------------
# Wait for the router to finish rebooting and the modem to sync up


# Next, reboot networking to accept new MAC address
## This section only works if you power cycled your modem
### And make sure it takes less than the defined seconds in
### SLEEPTIME_BEFORE_MODEM_DHCP for it to come back up

sleep $SLEEPTIME_BEFORE_MODEM_DHCP;

# Bring the WAN interface ($WAN_INTERFACE) down and up, then request a new DHCP lease
ifconfig $WAN_INTERFACE down |& logger -t [SPOOFWANMAC]
ifconfig $WAN_INTERFACE up |& logger -t [SPOOFWANMAC]
dhclient $WAN_INTERFACE |& logger -t [SPOOFWANMAC]


# -----------------------------------------------------------------------------
# End of Script
# -----------------------------------------------------------------------------
# At this point, your WAN interface should be using a new, randomly generated,
# valid MAC address. Check your router and IP for confirmation.